

Appearance
HaloPSA Setup
Junto connects to HaloPSA and HaloITSM to sync tickets, clients, contacts, and notes. Once connected, the AI agent can read ticket details, post notes, create and update tickets, and assign work — directly in Halo.
Prerequisites
- A HaloPSA or HaloITSM instance reachable over HTTPS at a public hostname
- A Halo administrator account that can open Configuration → Integrations
- A Junto admin or owner account
- Your instance URL as an origin only — for example
https://acme.halopsa.com
Step 1: Create a Dedicated Junto Agent
In Halo, create an agent named Junto and use it for nothing else.
Assign the agent to every team you want Junto to manage. Junto only sees tickets on the teams its agent belongs to — a team left off is invisible to sync, triage, and the agent. Add new teams to the Junto agent as you create them.
Then open Configuration → Teams & Agents → Agents → Junto → Permissions and set:
- The Administrator role — or, at minimum, full Read and Modify access to the Tickets and Actions modules.
- Under Miscellaneous Permissions, Can impersonate Users to Yes.
Finally, in Configuration → Advanced Settings, enable Give admins additional privileges and Allow admins to impersonate Agents.
Without these, Halo refuses to let the agent set the technician on an action, and time entries post as the Junto agent instead. See Step 6.
Step 2: Create the API Application
In Halo, go to Configuration → Integrations → HaloPSA API (labelled HaloITSM API on HaloITSM instances).
Note the Resource Server URL — for example
https://acme.haloitsm.com/api. Enter the origin of this URL in Junto, without the/apipath. If a Tenant value is shown, note it too.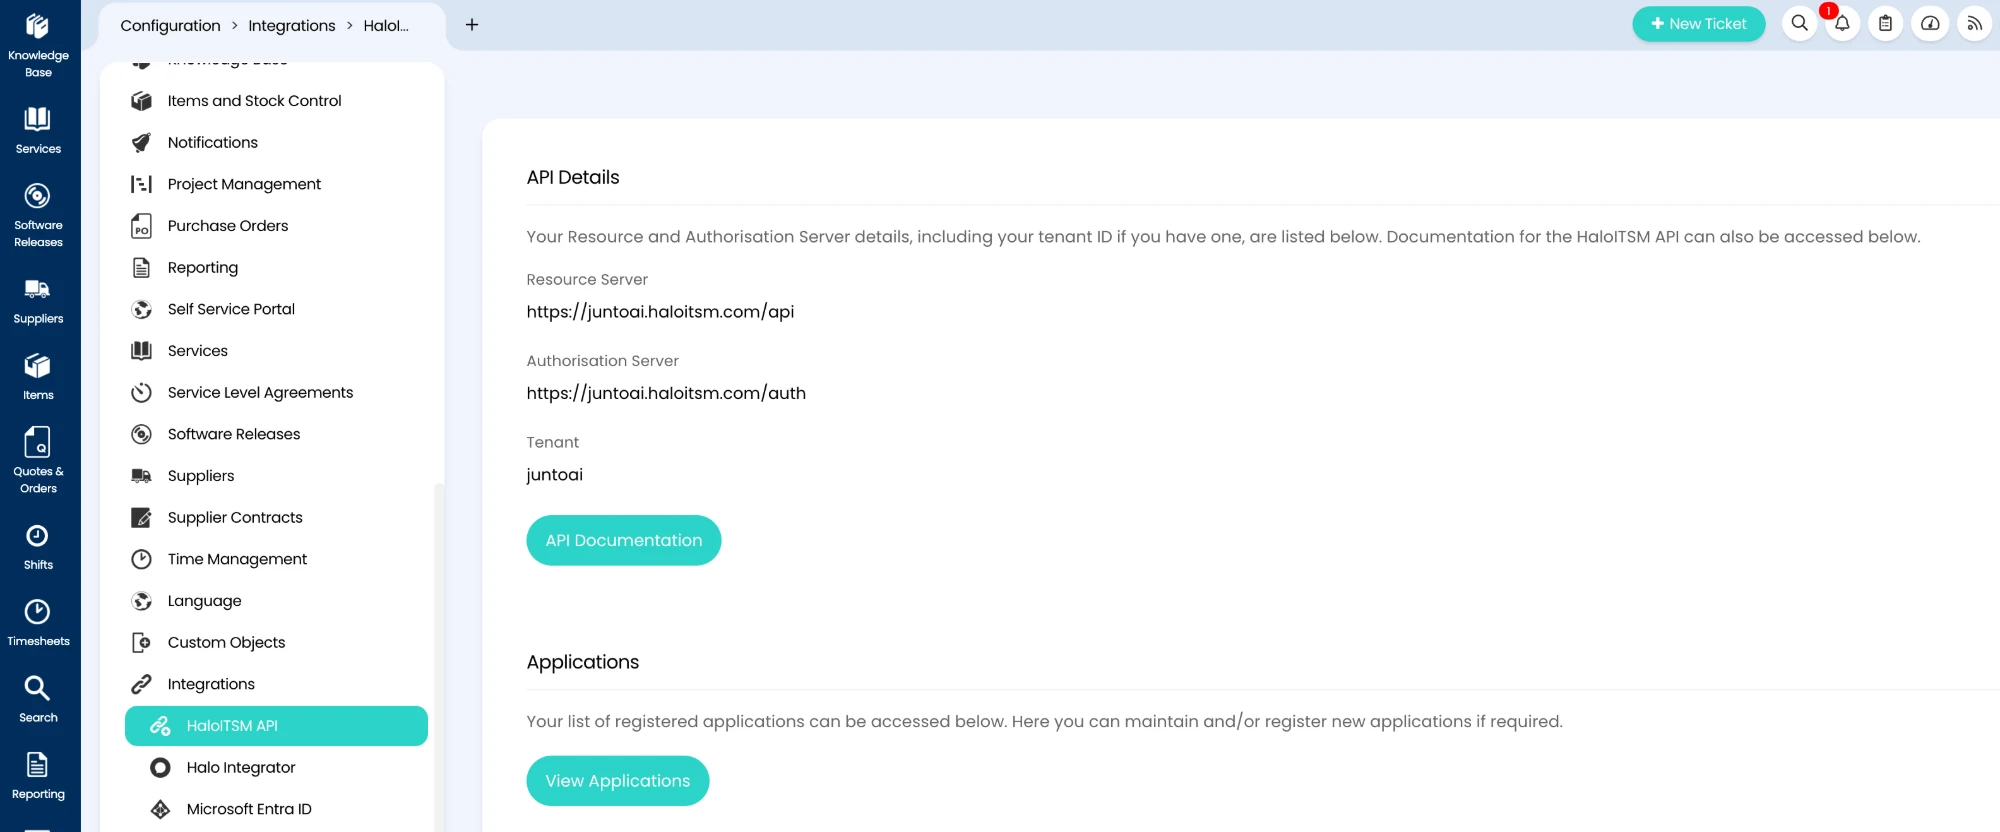
Click View Applications, then New.
On the Details tab:
Setting Value Application Name JuntoActive Checked Authentication Method Client ID and Secret (Services) Agent to log in as The Junto agent from Step 1 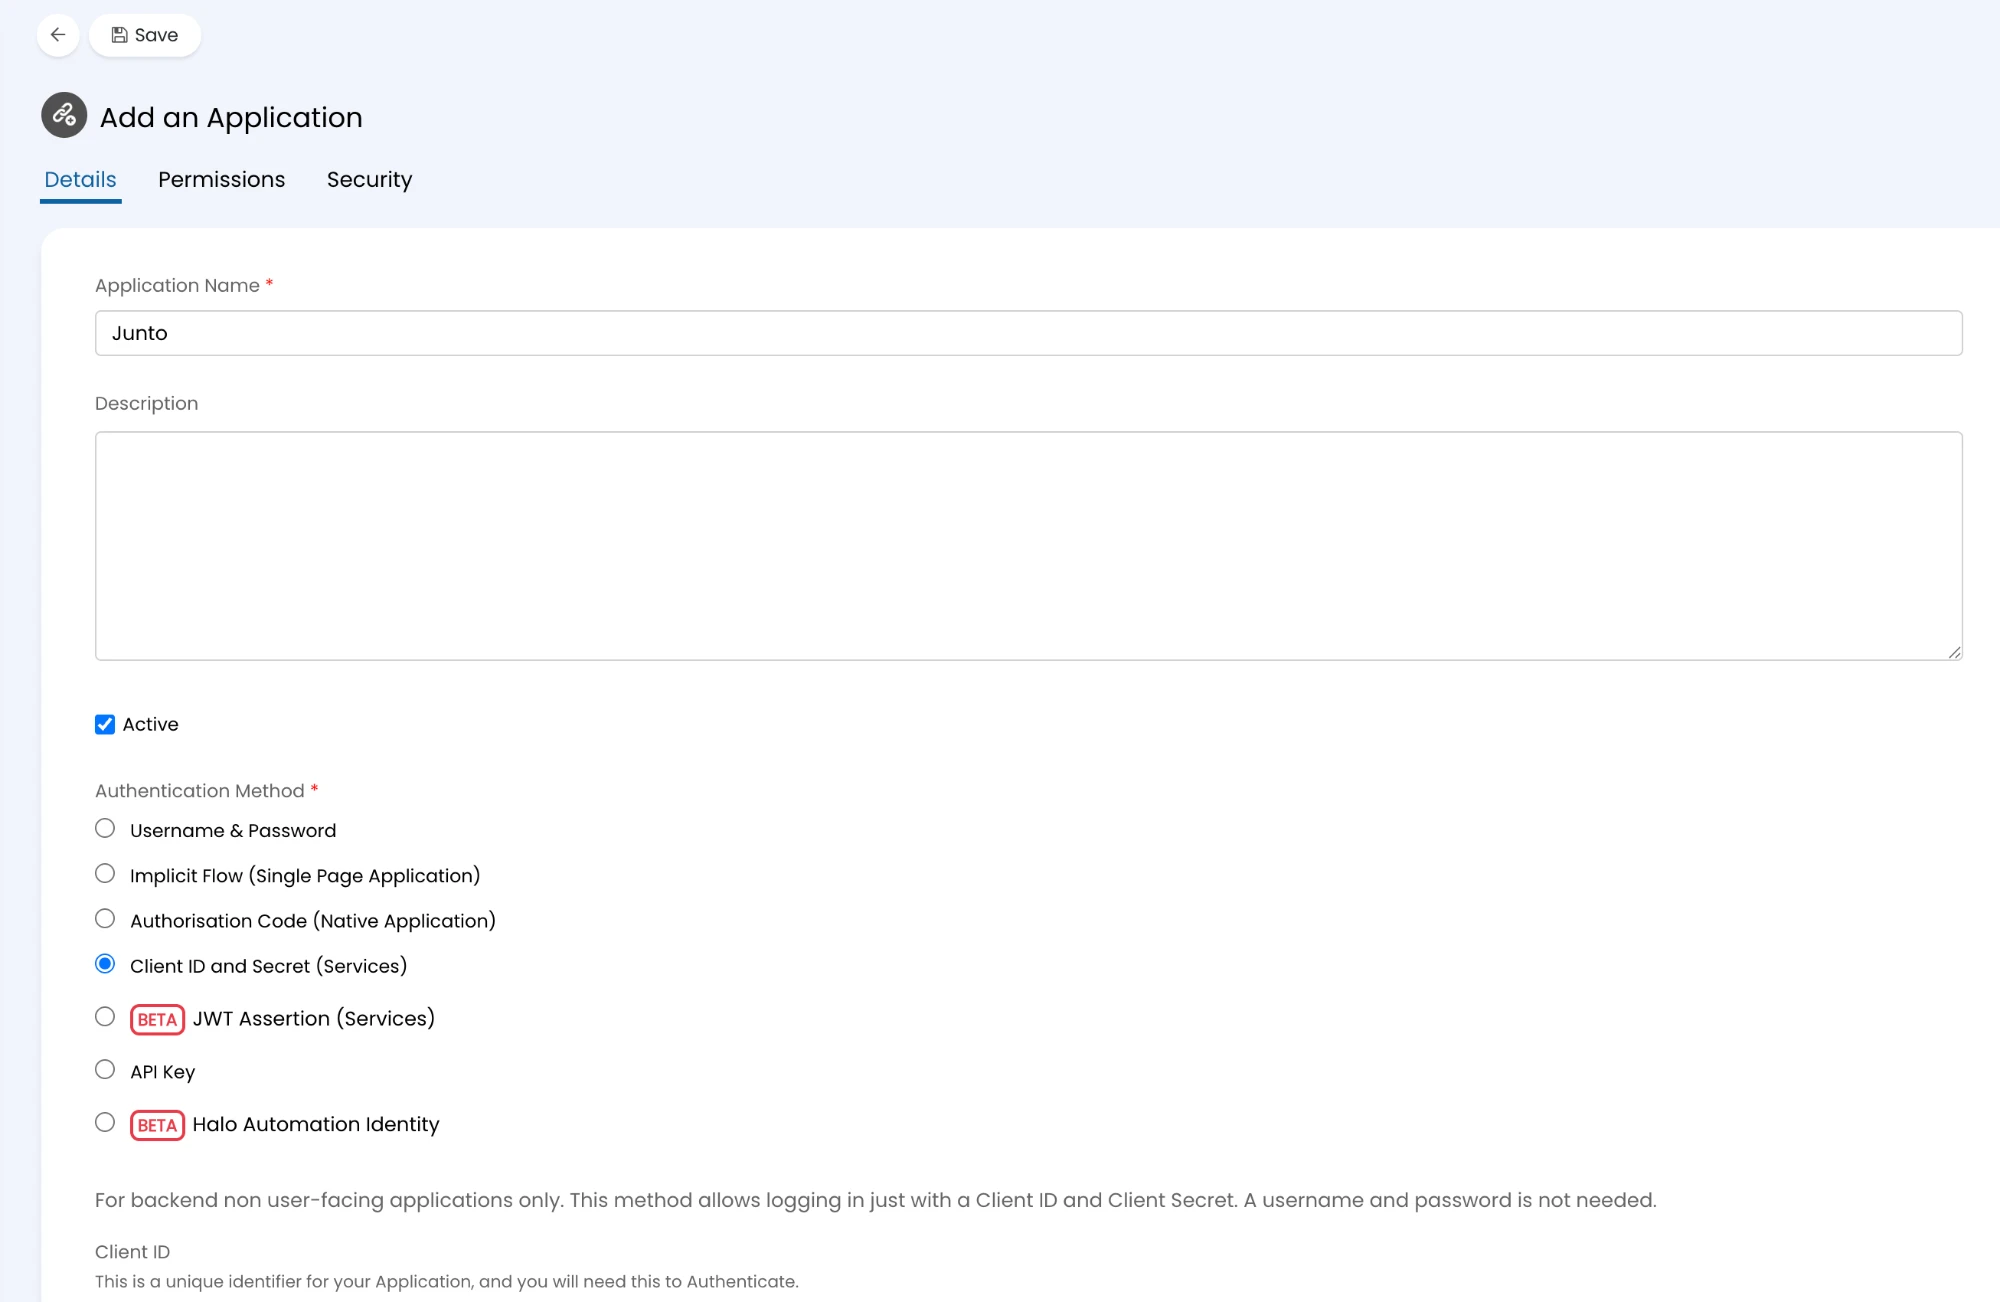
On the Permissions tab, check all and admin:webhooks.
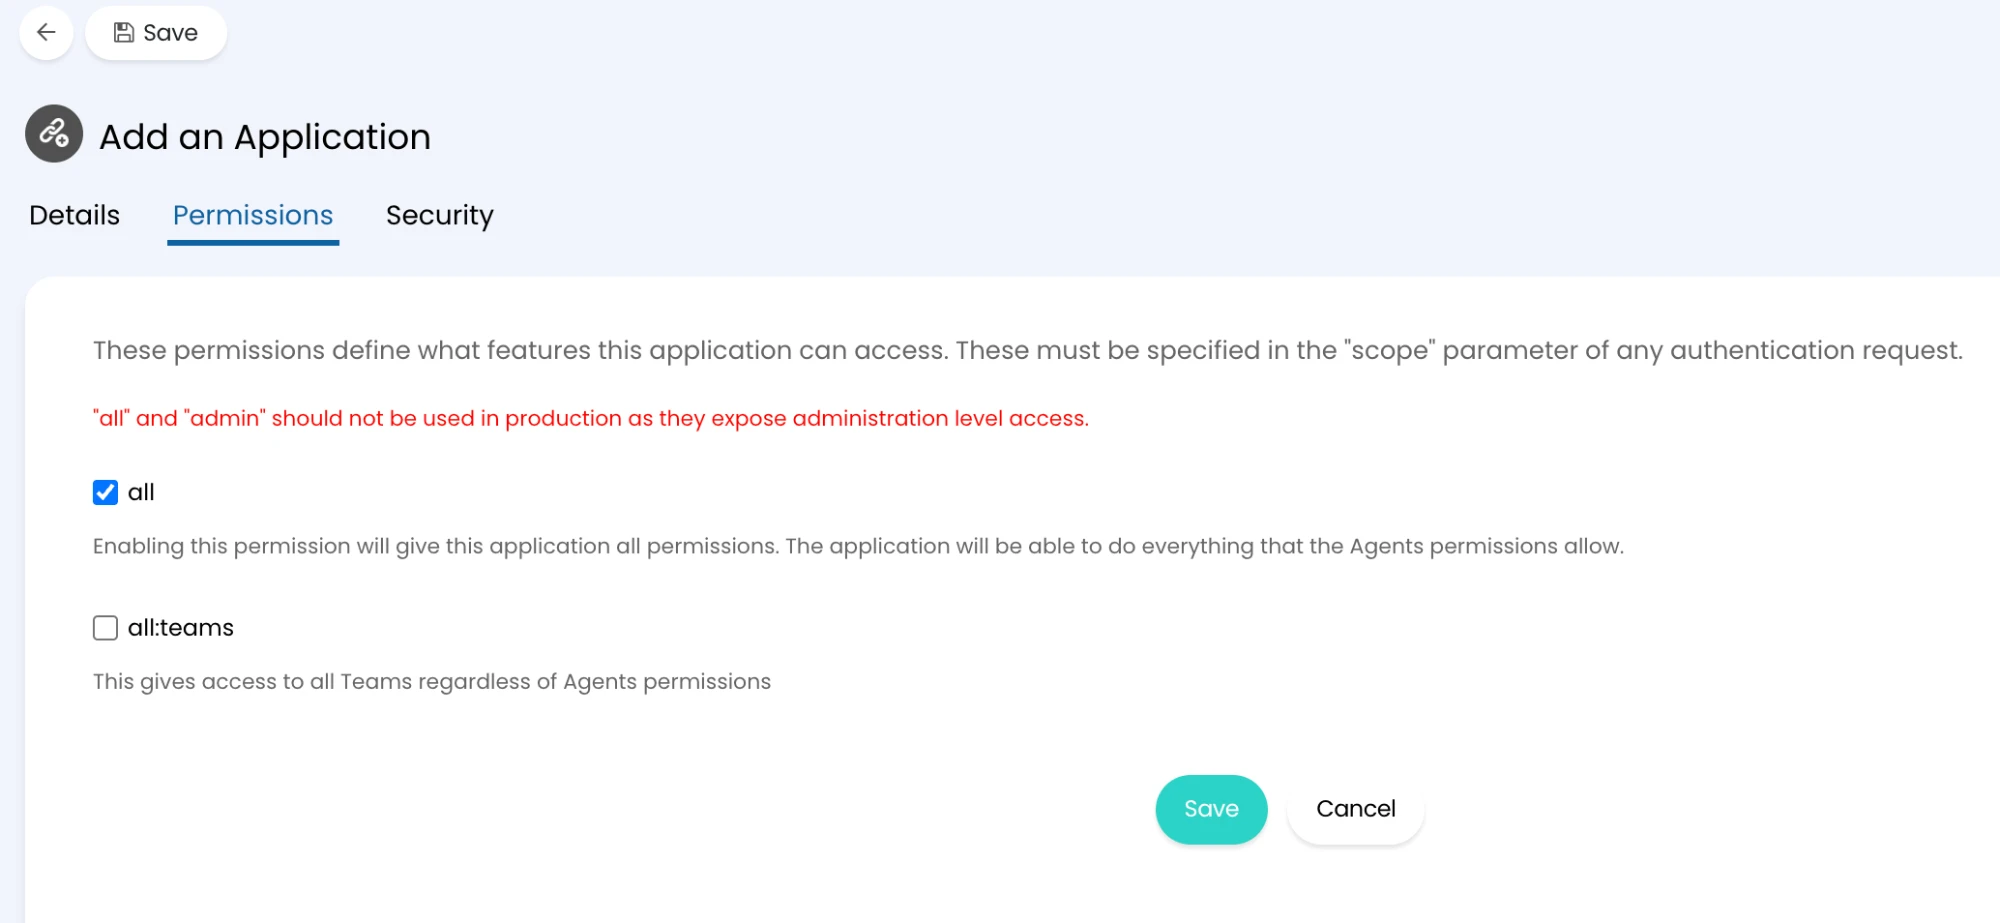
Can't see
admin:webhooks? Uncheck all to reveal the full scope list, tick admin:webhooks, then tick all again.Click Save, then copy the Client ID and Client Secret. The secret is shown once — copy it before closing.
Step 3: Connect in Junto
In Junto, go to Settings → Integrations → HaloPSA and click Connect HaloPSA.
Fill in:
Field Required Value Instance URL Yes Origin only — https://acme.halopsa.com, nothttps://acme.halopsa.com/apiClient ID Yes From Step 2 Client secret Yes From Step 2 Tenant No Leave blank. Fill in the tenant id from Step 2 only if the credentials are rejected 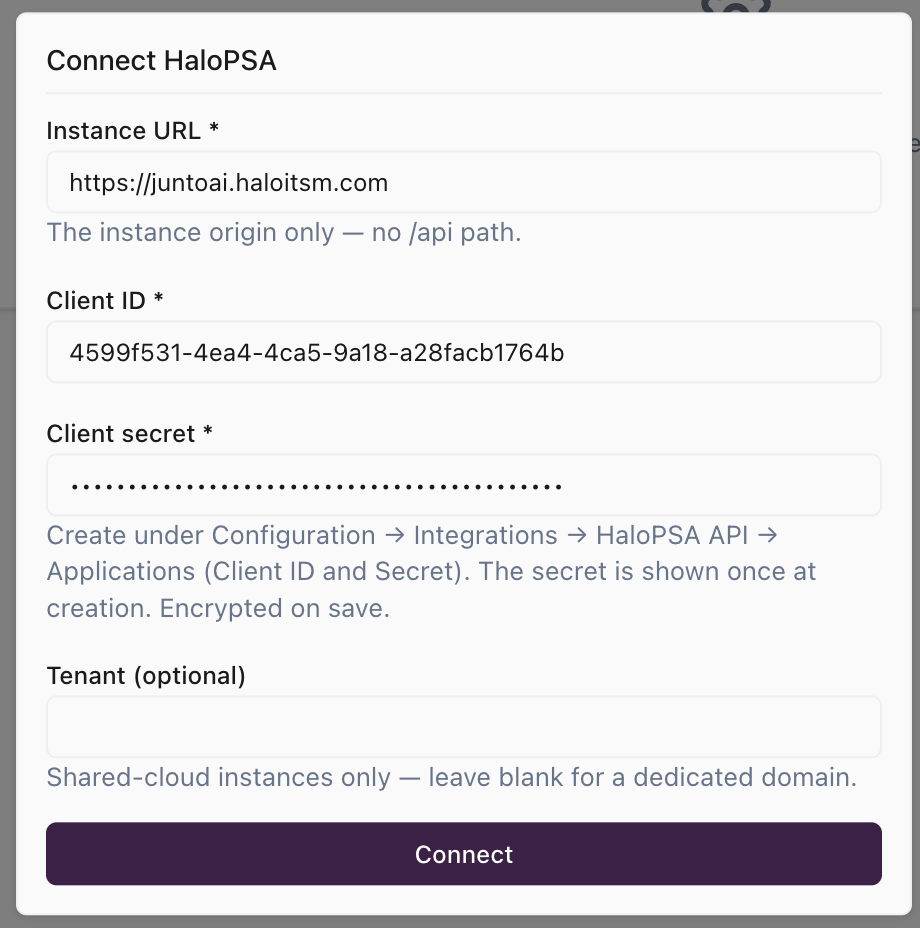
Click Connect, then Test connection on the card.
A green Connected badge means the credentials are valid. Setup required means the card has an error to fix.
Step 4: Set the Webhook Signing Secret
Junto registers the Halo webhook automatically. The signing secret has to be set by hand, in both places — pick any value and enter it twice:
- In Junto — on the HaloPSA card, click Set webhook secret, enter the value, and save.
- In Halo — go to Configuration → Integrations → Webhooks →
junto-halo-webhook, enter the same value in Secret Key, and save.
Until both sides match, ticket changes reach Junto through the 15-minute sync rather than in seconds.
Webhook Status on the Card
| Status | Meaning |
|---|---|
| Webhooks active | Registered and a secret is on file |
| Action needed: set a webhook secret | Registered, but no secret on file — see above |
| Webhooks updating… | A registration pass is running |
| Webhooks failed | The card shows the reason |
| Registration turned off | Disabled for this Junto environment. Tickets sync every 15 minutes |
Step 5: Map Statuses
- On the HaloPSA card, click Status mappings.
- Click Seed from Halo. The dialog is empty until you do.
- Adjust each row:
| Junto Status | Map to these Halo statuses |
|---|---|
| New | New, Open — triggers intake processors (triage, priority, categorization, sentiment) |
| Active | In Progress, Assigned, Scheduled, and anything else |
| Waiting | Awaiting Customer, Awaiting Third Party |
| Resolved | Resolved, Complete — triggers resolution processors |
| Closed | Closed, Cancelled — no processors run |
| Child | Statuses for tickets merged under a parent |
Re-seeding re-classifies every status, including rows you adjusted by hand. Re-seed only when Halo's status list changes.
Step 6: Map Members
- On the HaloPSA card, click Member mappings.
- Click Auto-map from Halo to match users by email, then name.
- Set any remaining rows from the Halo agent dropdown.
Auto-map overwrites existing mappings, including ones set by hand, so it asks for confirmation first. Users whose Halo agent is already taken are skipped.
Mappings gate ticket assignment, approval routing, and time-entry attribution — an unmapped technician's time posts as the Junto agent. Sync, triage, note writing, and ticket creation work without them.
Step 7: Run the Initial Sync
Click Sync now on the card. The first sync walks all clients and contacts, and tickets over a 90-day window. After that, Junto syncs every 15 minutes.
Setting Up Webhooks Manually
Do this only if the card shows Webhooks failed, or if webhook registration is turned off for your environment.
Create the Webhook
In Halo, go to Configuration → Integrations → Webhooks and click New:
| Field | Value |
|---|---|
| Name | junto-halo-webhook |
| Active | Checked |
| URL | Copy it from the HaloPSA card in Junto |
| Method | POST |
| Content Type | application/json |
| Authentication Type | Sign Request Body with a Secret Key |
| Authentication Header | x-halo-signature |
| Algorithm | SHA-256 |
| Secret Key | The value from Step 4 |
Add the Events
Add one subscription per row:
| Event | Criteria |
|---|---|
| New Ticket Logged | None |
| Ticket Updated by User | None |
| Ticket Changed | Status → Value changed → To any value |
| Action added by agent | Outcome: Note Added |
Ticket Changed needs a criterion — Halo rejects it with "You must choose at least one criteria" if left blank.
Notes written in Halo under a custom outcome won't trigger an immediate delivery, but still reach Junto at the next 15-minute sync.
Check Deliveries
Halo's Deliveries view on the webhook lists every attempt with headers, body, and response status, kept for 30 days with a redeliver button per row.
What the Agent Can Do
Tickets — read and search tickets, create and update them, assign to agents, read and post notes (internal, resolution, and customer-facing), log time, read status options and checklists.
Clients and contacts — read and search clients and contacts, create and update contacts, list sites and client alerts.
Assets — search and read assets, list asset types and their fields.
Knowledge base — search and read KB articles.
Contracts and billing — search and read contracts, check client entitlements, read ticket billing and invoices.
Catalog and procurement — search and read catalog items and purchase orders.
Projects — search, read, create, and update projects, add project tasks, list project types.
Sales — search opportunities and summarize the pipeline, search and read quotes, create quotes.
Time — search time entries and read time logged on a ticket.
Time entries are attributed to the technician, via their member mapping. Notes post as the Junto agent from Step 1.
Troubleshooting
- "Halo rejected the client credentials" — Re-check the Client ID. If the secret wasn't captured at creation, generate a new one in Halo and use Rotate client secret on the card. On a shared-cloud instance, add the tenant id.
- "Authenticated, but the API rejected the token (HTTP 401)" — Check Agent to log in as on the API application, and that the Junto agent is enabled.
- "The API application is missing required scopes (HTTP 403)" — Grant all and admin:webhooks on the application's Permissions tab.
- "Could not reach
<host>" — Check the instance URL is the origin only, with no/apipath, and that the host is publicly reachable. - Rate limit reached — Halo allows 700 requests per rolling 5 minutes. Wait and retry.
- Tickets arrive slowly — The webhook secret isn't set on both sides. See Step 4.
- Statuses behaving oddly — Seed and map statuses in Step 5.
- A team's tickets never appear — Add the Junto agent to that team in Halo. See Step 1.
- Time posts as the Junto agent instead of the technician — Check the technician's member mapping in Step 6, then the agent permissions in Step 1: the Junto agent needs Can impersonate Users and elevated rights on Tickets and Actions.