Appearance
Autotask PSA Setup
Junto integrates with Datto Autotask PSA to sync tickets, companies, contacts, and time entries — providing the foundation for signal triage. Once connected, the AI agent can read ticket details, post notes, log time, reassign tickets, and bundle or merge tickets directly in Autotask.
Prerequisites
- A Datto Autotask PSA instance, with admin access to create resources and security levels
- An API-only user (resource) in Autotask with its username and secret
- A security level for that user that allows webhook creation (so Junto can keep data in sync in real time) and resource impersonation (so the AI agent's notes and time entries are attributed to the right technician)
Junto resolves your Autotask zone and API base URL automatically — you don't need to look these up.
Step 1: Create a Security Level for the API User
Autotask's built-in API User (system) (API-only) role already grants the base permissions Junto needs — but it doesn't allow webhook creation or impersonation. Rather than build a security level from scratch, copy that role and change only two sections: Other (to enable webhooks) and Web Services API (to enable impersonation). Leave every other section exactly as it comes from the copy.
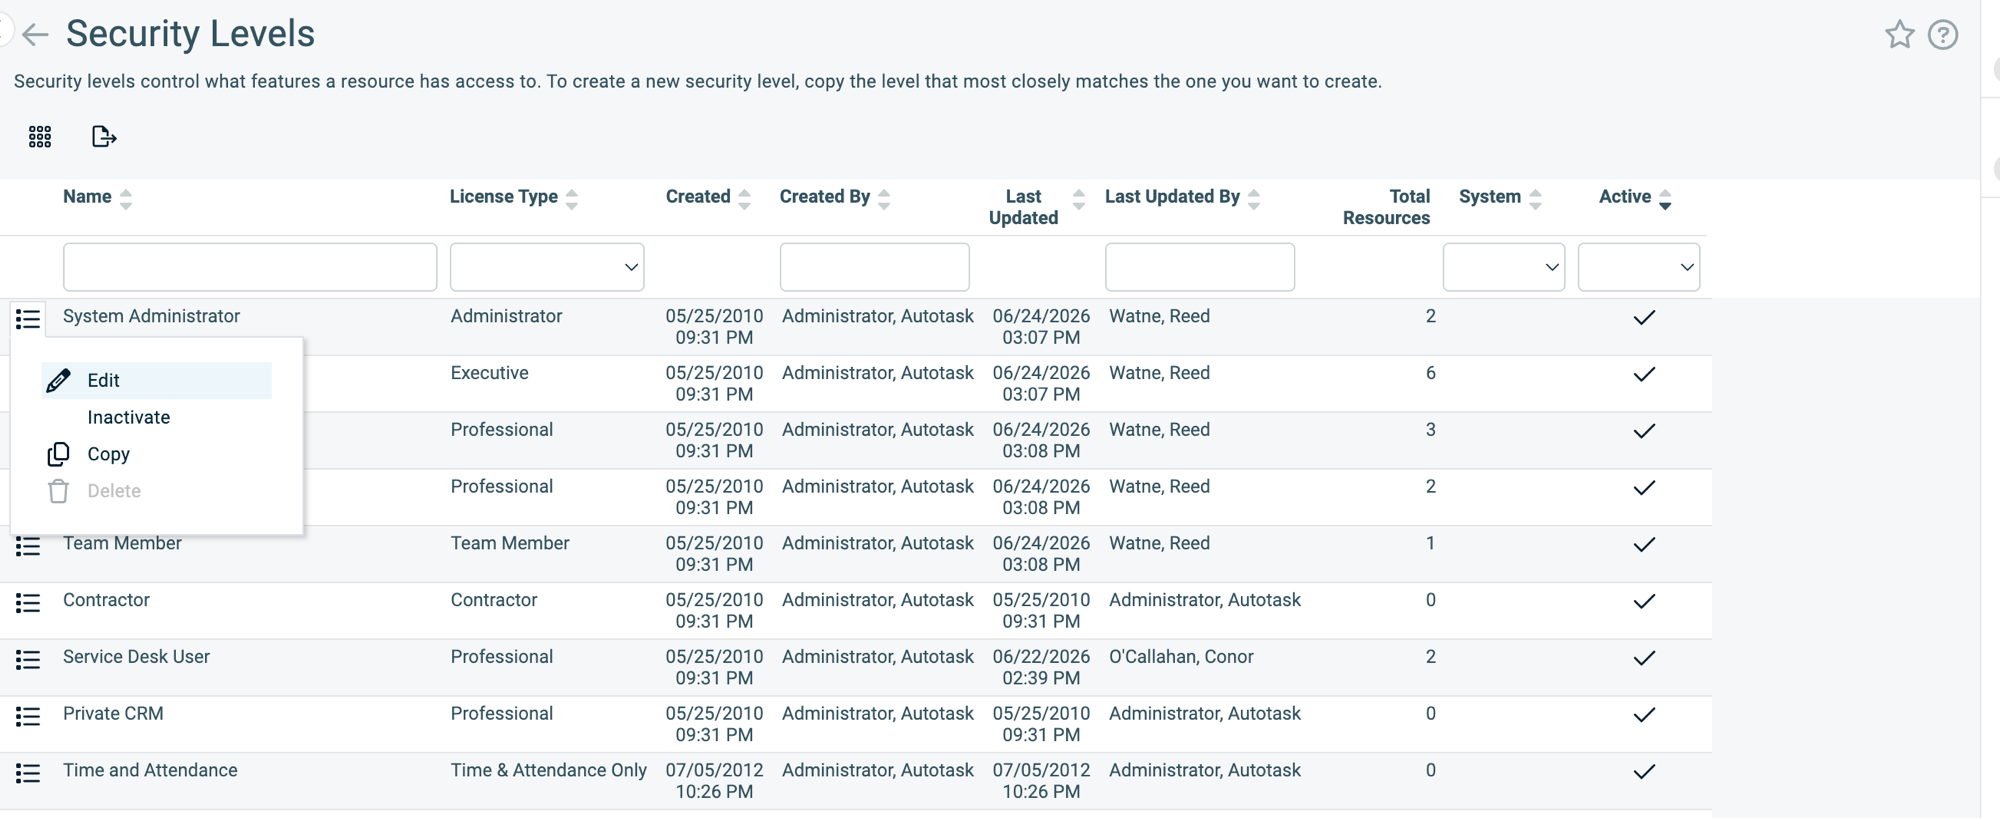
In Autotask, go to Admin > Account Settings & Users > Resources/Users (HR) > Security > Security Levels.
Find API User (system) (API-only), open the row's menu (the icon at the left of the row), and click Copy.
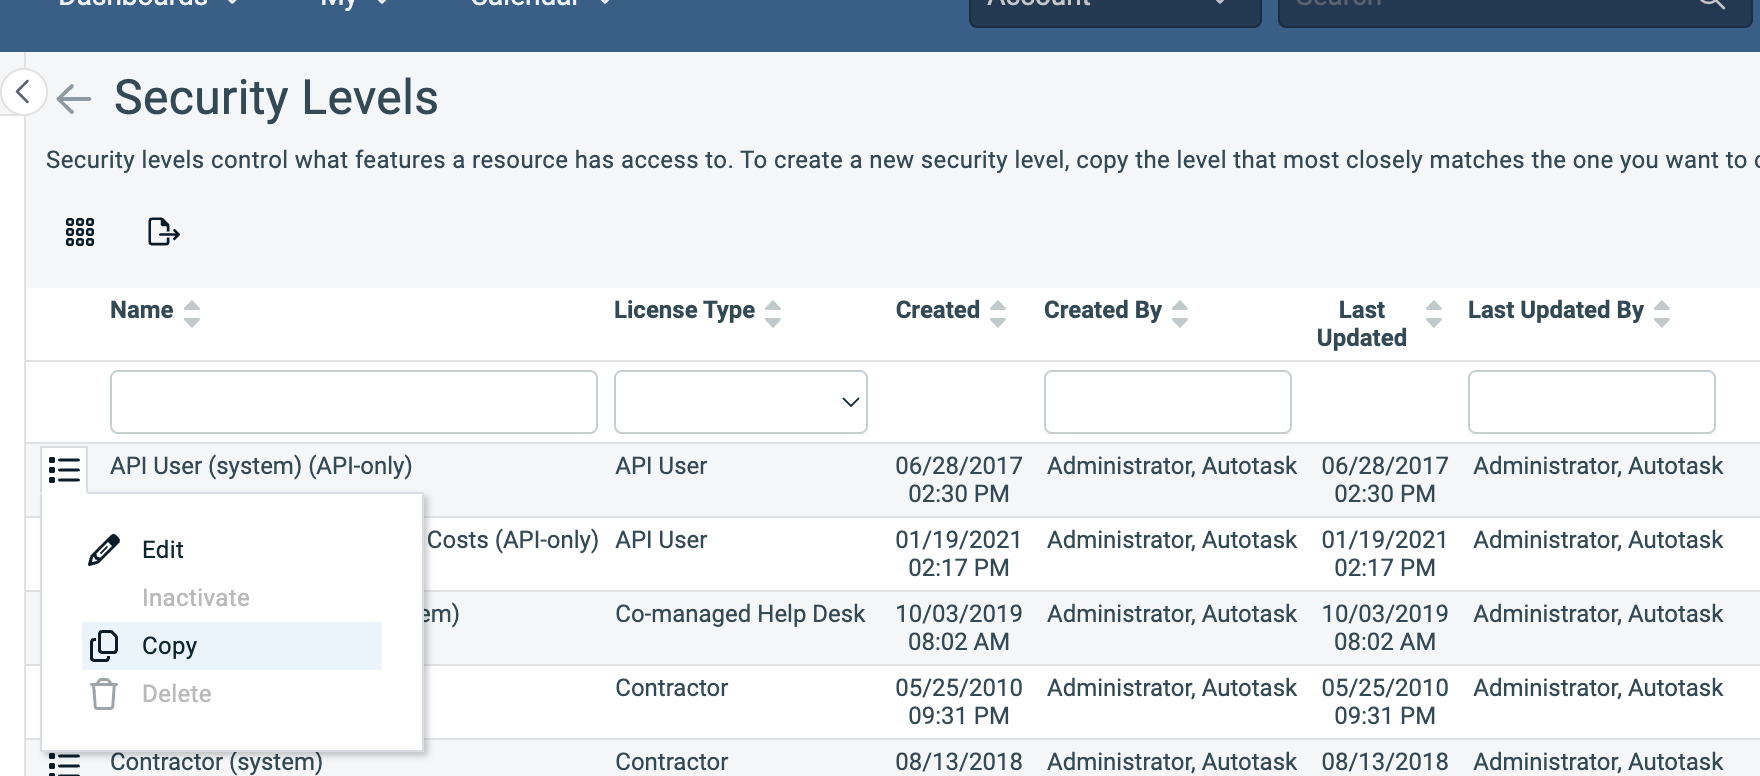
Rename the copied level to junto.
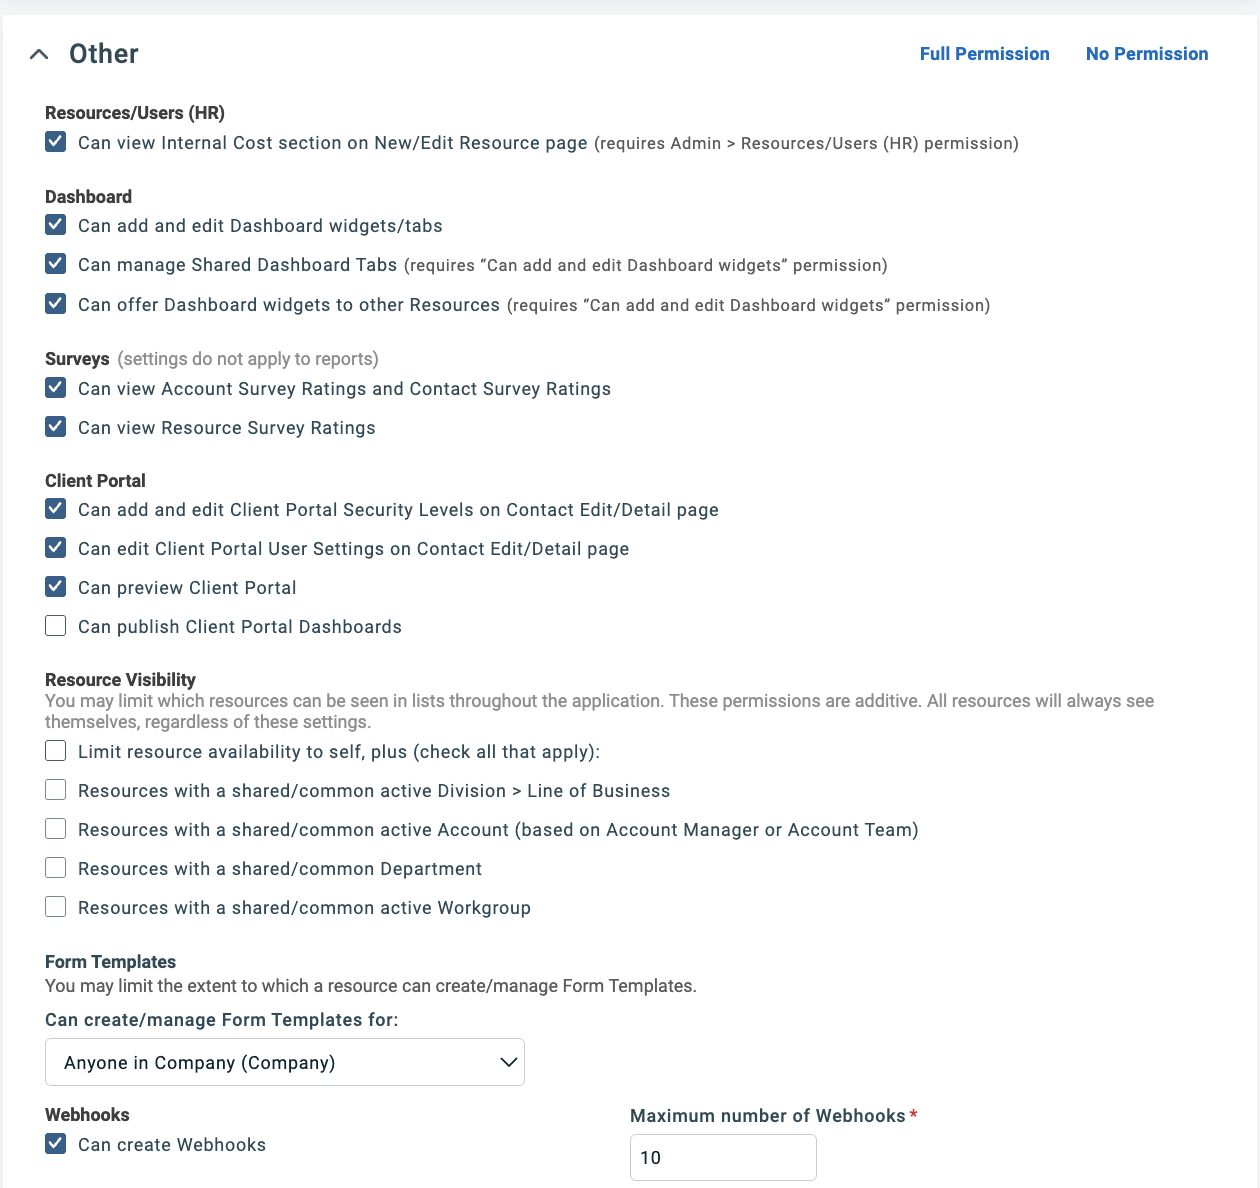
In the Other section, scroll to Webhooks at the bottom, enable Can create Webhooks, and set Maximum number of Webhooks to 10.
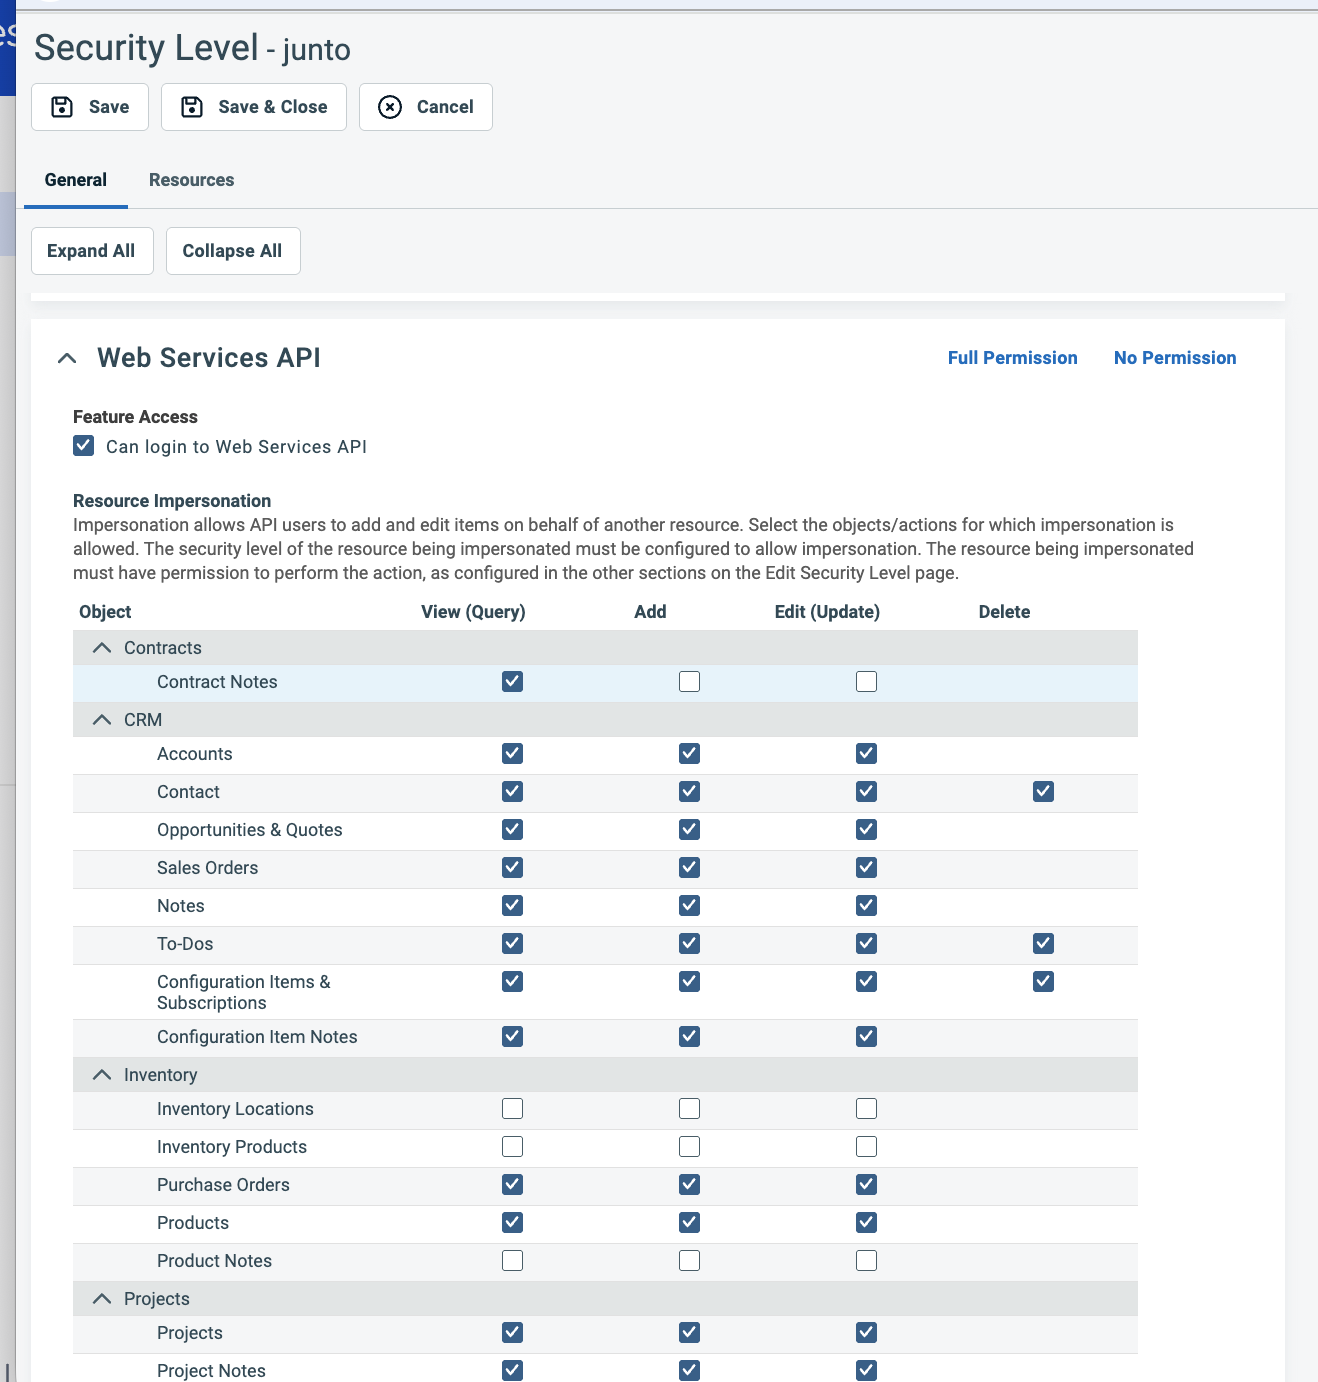
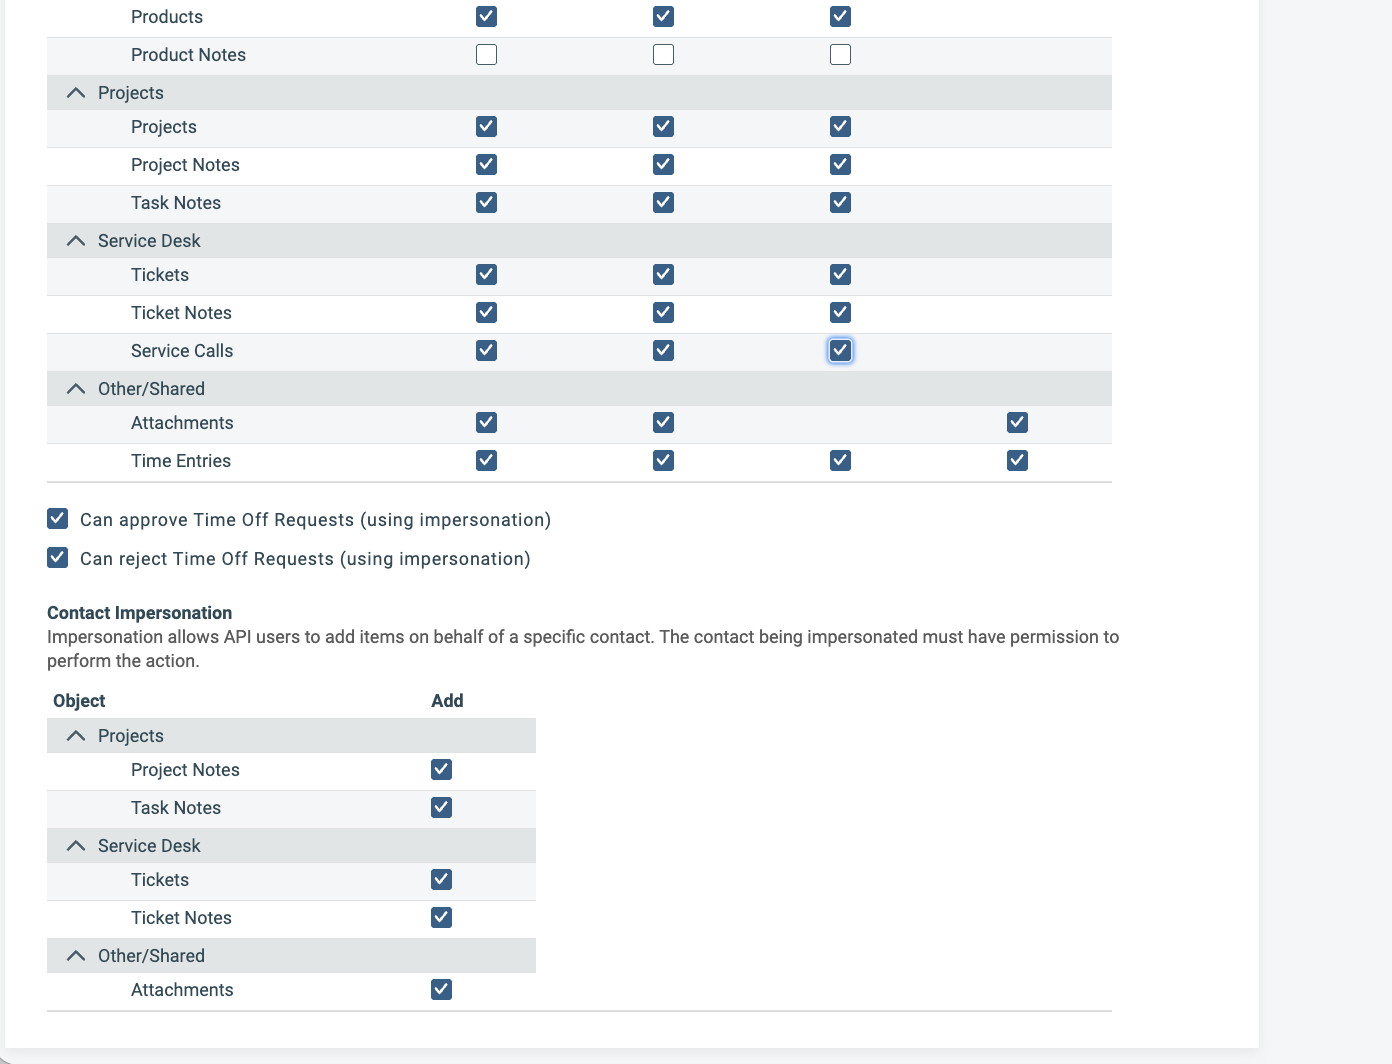
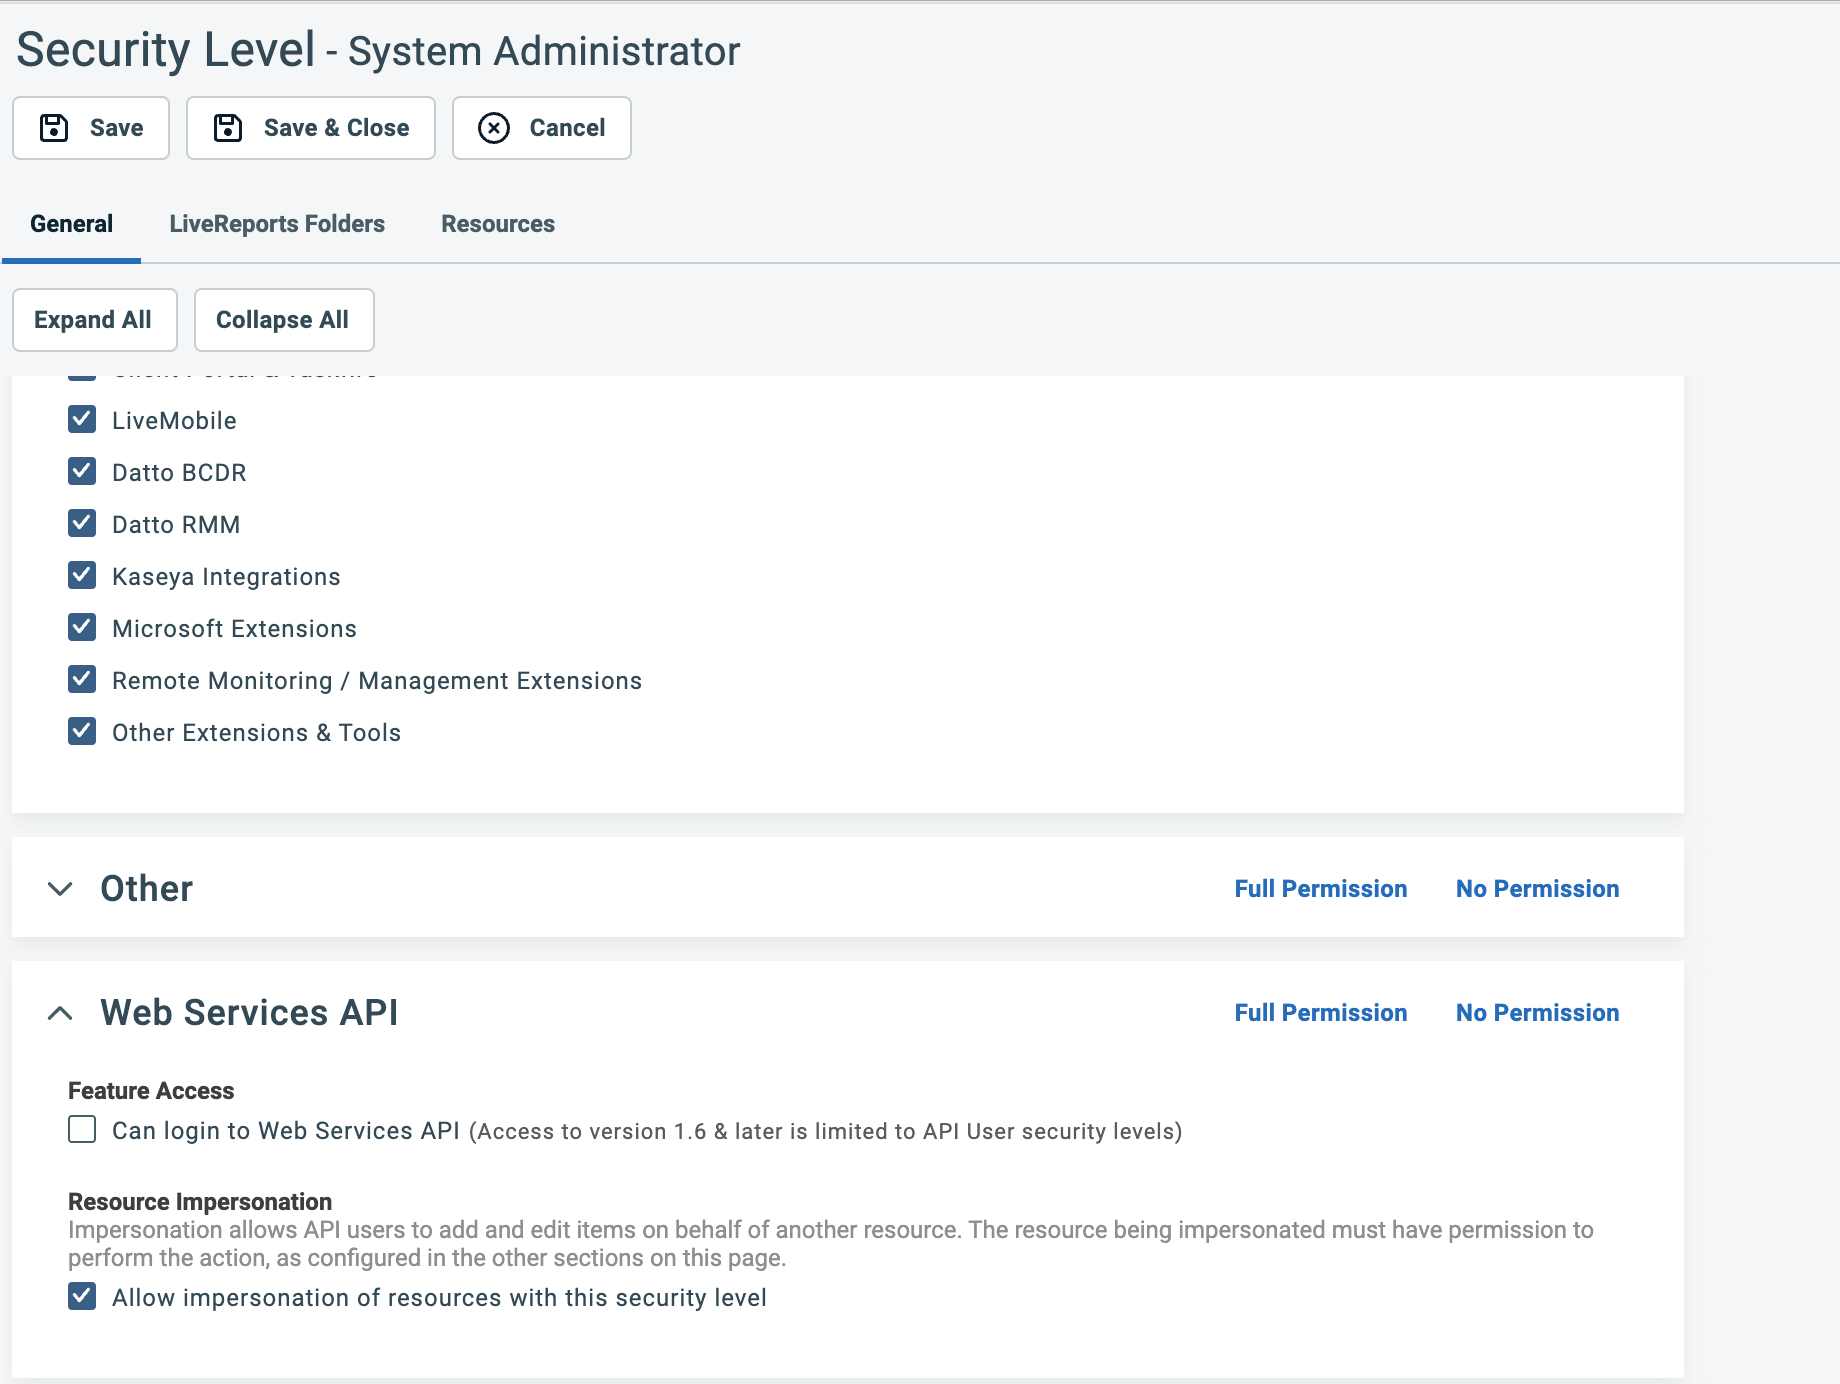
Scroll to the Web Services API section. Under Resource Impersonation, check all the impersonation permissions so Junto can act on behalf of your technicians — Tickets, Ticket Notes, Service Calls, Attachments, and Time Entries.
Continue down through Contact Impersonation and check the matching permissions there as well — Tickets, Ticket Notes, Project Notes, Task Notes, and Attachments.
Click Save & Close.
Don't touch the other sections. The copied role already has the access Junto needs. Only the Other and Web Services API sections above need changes — leave every other section at its copied default.
Step 2: Enable Impersonation on Technician Security Levels
So that ticket notes and time entries created by the AI agent appear under each technician's own name — rather than the API account — enable impersonation on every security level your resources use.
Required for correct attribution. Impersonation is what lets Junto update tickets and log time entries as the right resource instead of the API account. Without it, every note and time entry Junto creates will be attributed to your API user. Enable it on each security level your technicians belong to.
- Go to Admin > Account Settings & Users > Security > Security Levels.
- Filter the Active column to Yes (active) to see the levels currently in use.
- For each active security level assigned to your technicians:
Open the row's menu (the icon at the left of the row) and click Edit.
Scroll to the bottom of the page and expand the Web Services API section.
Under Resource Impersonation, check Allow impersonation of resources with this security level.
Click Save & Close.
Step 3: Create an API-Only User in Autotask
In Autotask, go to Admin > Account Settings & Users > Resources/Users (HR) > Resources/Users.
From the New button dropdown, select New API User.
Fill in the required fields (first name, last name, email, etc.).
Set the Security Level to junto — the level you created in Step 1. This grants the system access Junto needs and allows webhook creation for real-time sync.
In the Credentials section:
- Click Generate Key to create the username.
- Click Generate Secret to create the password.
- Save both somewhere safe — you'll need them in the next step, and the secret is only shown during creation.
Under API Tracking Identifier, select Integration Vendor and choose Junto Platforms from the dropdown.
Under Line of Business, move one or more lines of business into the Associated list to authorize the integration account.
Click Save & Close.

Note: The Key is the username and the Secret is the password you'll enter into Junto.
Step 4: Configure in Junto
- In Junto, go to Settings > Integrations > Autotask PSA.
- Click Add Configuration and fill in:
- API User Email — The Key (username) you generated in Step 3.
- Secret — The Secret you generated in Step 3. It is encrypted on save.
- Click Create. Junto detects your Autotask zone, resolves the API base URL, and validates the connection.
When the configuration card shows a green Connected badge, the credentials are valid. A yellow Setup Required badge means the connection needs attention — check the error message on the card.
Step 5: Configure Queues
Choose which Autotask ticket queues Junto should monitor:
- On the configuration card, click Configure queues.
- Select the queues you want to sync tickets from, then save.
Only tickets from the selected queues flow into Junto for triage.
Step 6: Map Statuses
Each Autotask ticket status must be mapped to a Junto signal status. This mapping controls how tickets flow through Junto and which processors run on them. Autotask statuses are global (not per-queue).
- On the configuration card, click Statuses.
- Click Seed from Autotask to pull the live status list.
- For each Autotask status, choose the matching Junto status.
| Junto Status | Meaning | Map to these Autotask statuses |
|---|---|---|
| New | Ticket just arrived, needs triage | New, Open — statuses for tickets that haven't been looked at yet |
| Child | Merged or bundled under a parent ticket | Statuses for tickets that are part of a parent ticket |
| Resolved | Work is done, pending confirmation | Resolved, Complete — triggers resolution processors (AI resolution summary, service catalog classification) |
| Closed | Fully closed, no further action | Closed, Cancelled — final state, no processors run |
| Active | Everything else | All remaining statuses (In Progress, Waiting Customer, Scheduled, etc.) |
Why this matters:
- New triggers intake processors — triage, priority classification, categorization, sentiment analysis
- Resolved triggers resolution processors — AI resolution summary, resolution comparison, service catalog classification
- Closed is a terminal state — tickets are hidden from the default signal view
- Child tickets are excluded from the main signal list to avoid duplicates
- Active is the working state — tickets are visible and monitored but don't trigger intake processors again
Tip: When in doubt, map a status to Active. Only map to New, Child, Resolved, or Closed when the status clearly matches those definitions.
Step 7: Map Members
Link your Junto users to their Autotask resource records:
- On the configuration card, click Members.
- For each Junto user, select their corresponding Autotask resource.
This mapping enables time entries and ticket notes created by the AI agent to be attributed to the correct technician. For attribution to post under the technician's own name in Autotask, that technician's security level must have impersonation enabled — see Step 2.
Step 8: Run Initial Sync
Click Sync now to perform the initial data import. This runs in the background and syncs:
- Companies — Companies from Autotask.
- Contacts — Contacts associated with synced companies.
- Tickets — Open tickets from the selected queues.
- Ticket notes — Discussion and resolution notes on synced tickets.
- Time entries — Time entries associated with synced tickets.
After the initial sync, Junto keeps your data up to date automatically.
Real-Time Sync
Junto registers webhooks in Autotask automatically when you connect the integration. Changes in Autotask — tickets, notes, time entries, companies, and contacts — sync to Junto in near real time. No manual webhook setup is required.
What the AI Agent Can Do
Once Autotask is connected, the AI agent can act on tickets directly in Autotask, including:
- Reading ticket details, contacts, and history
- Posting ticket notes and replies (attributed to the mapped technician)
- Logging time entries
- Assigning or reassigning tickets
- Bundling, unbundling, and merging tickets
Autotask Insight (Embedded Triage)
Junto can embed directly into your Autotask tickets as an Insight — an iframe on the ticket page that shows Junto's triage and lets technicians work without leaving Autotask.
In Junto
Scroll to the Vendor Insights embed card on the Autotask PSA settings page:
- Click Create configuration to provision the embed.
- Click Register in Autotask. Junto registers the Insight with your Autotask instance. The badge changes to Active once it's registered.
In Autotask
Registering makes the Insight available in Autotask, but an Autotask admin still has to turn it on and make it visible on tickets:
Enable the vendor insight. Go to Admin > Extensions & Integrations > Other Extensions & Tools > Integration Center, open the Junto Platforms vendor, and on the Vendor Insights tab check Active and Enable Integration Vendor Ticket Insights.
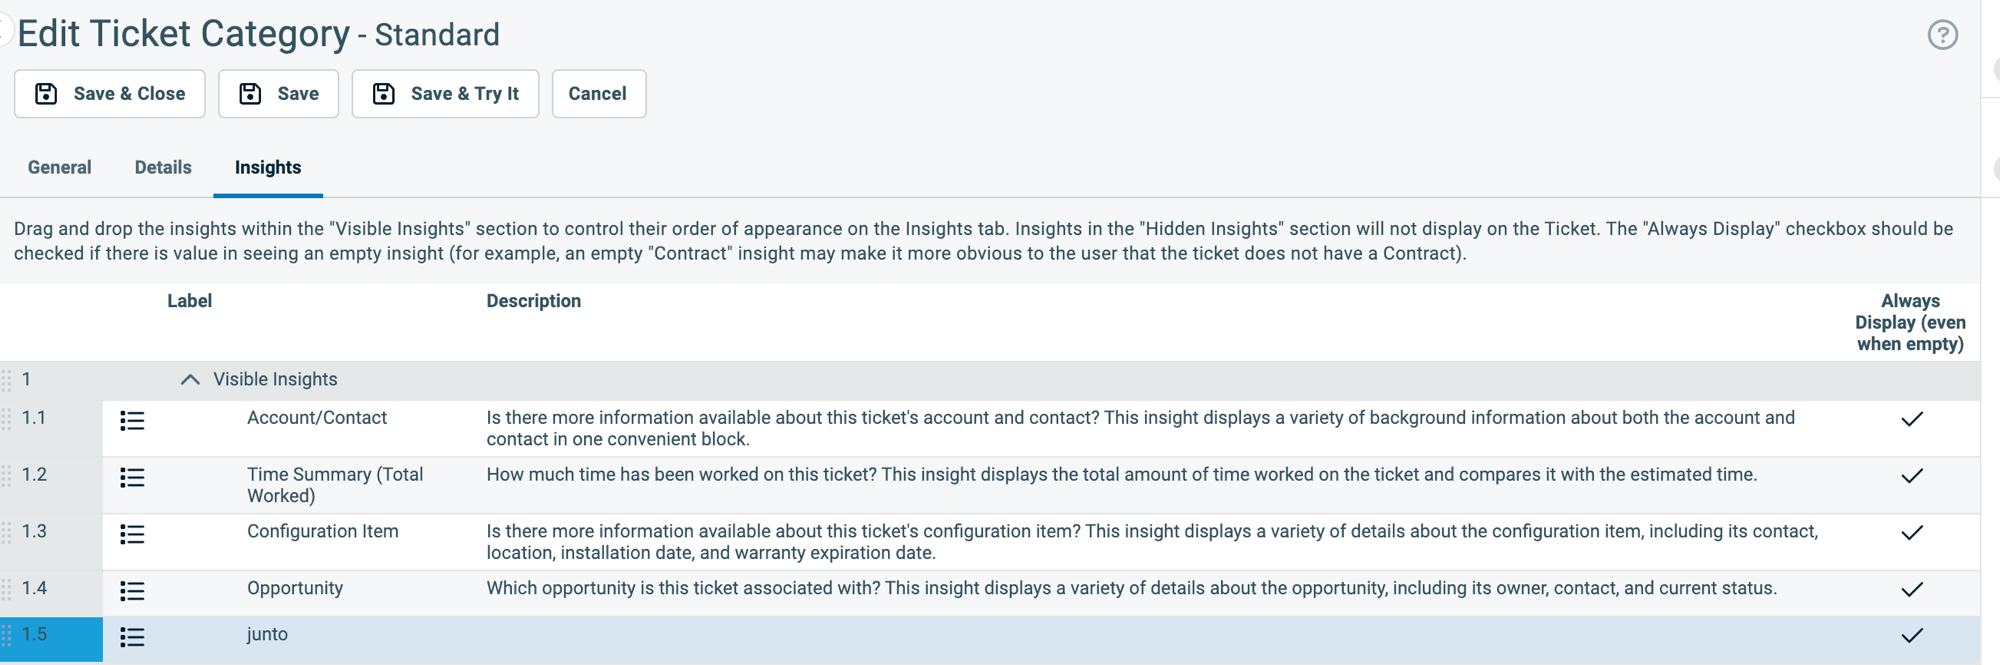
Make it visible on ticket categories. Go to Admin > Features & Settings > Service Desk (Tickets) > Ticket Categories, edit each category that should show the panel, and open the Insights tab. You'll see the junto insight listed alongside Autotask's built-in insights — drag it from Hidden Insights to Visible Insights (and check Always Display if you want the panel to show even when empty), then Save & Close.
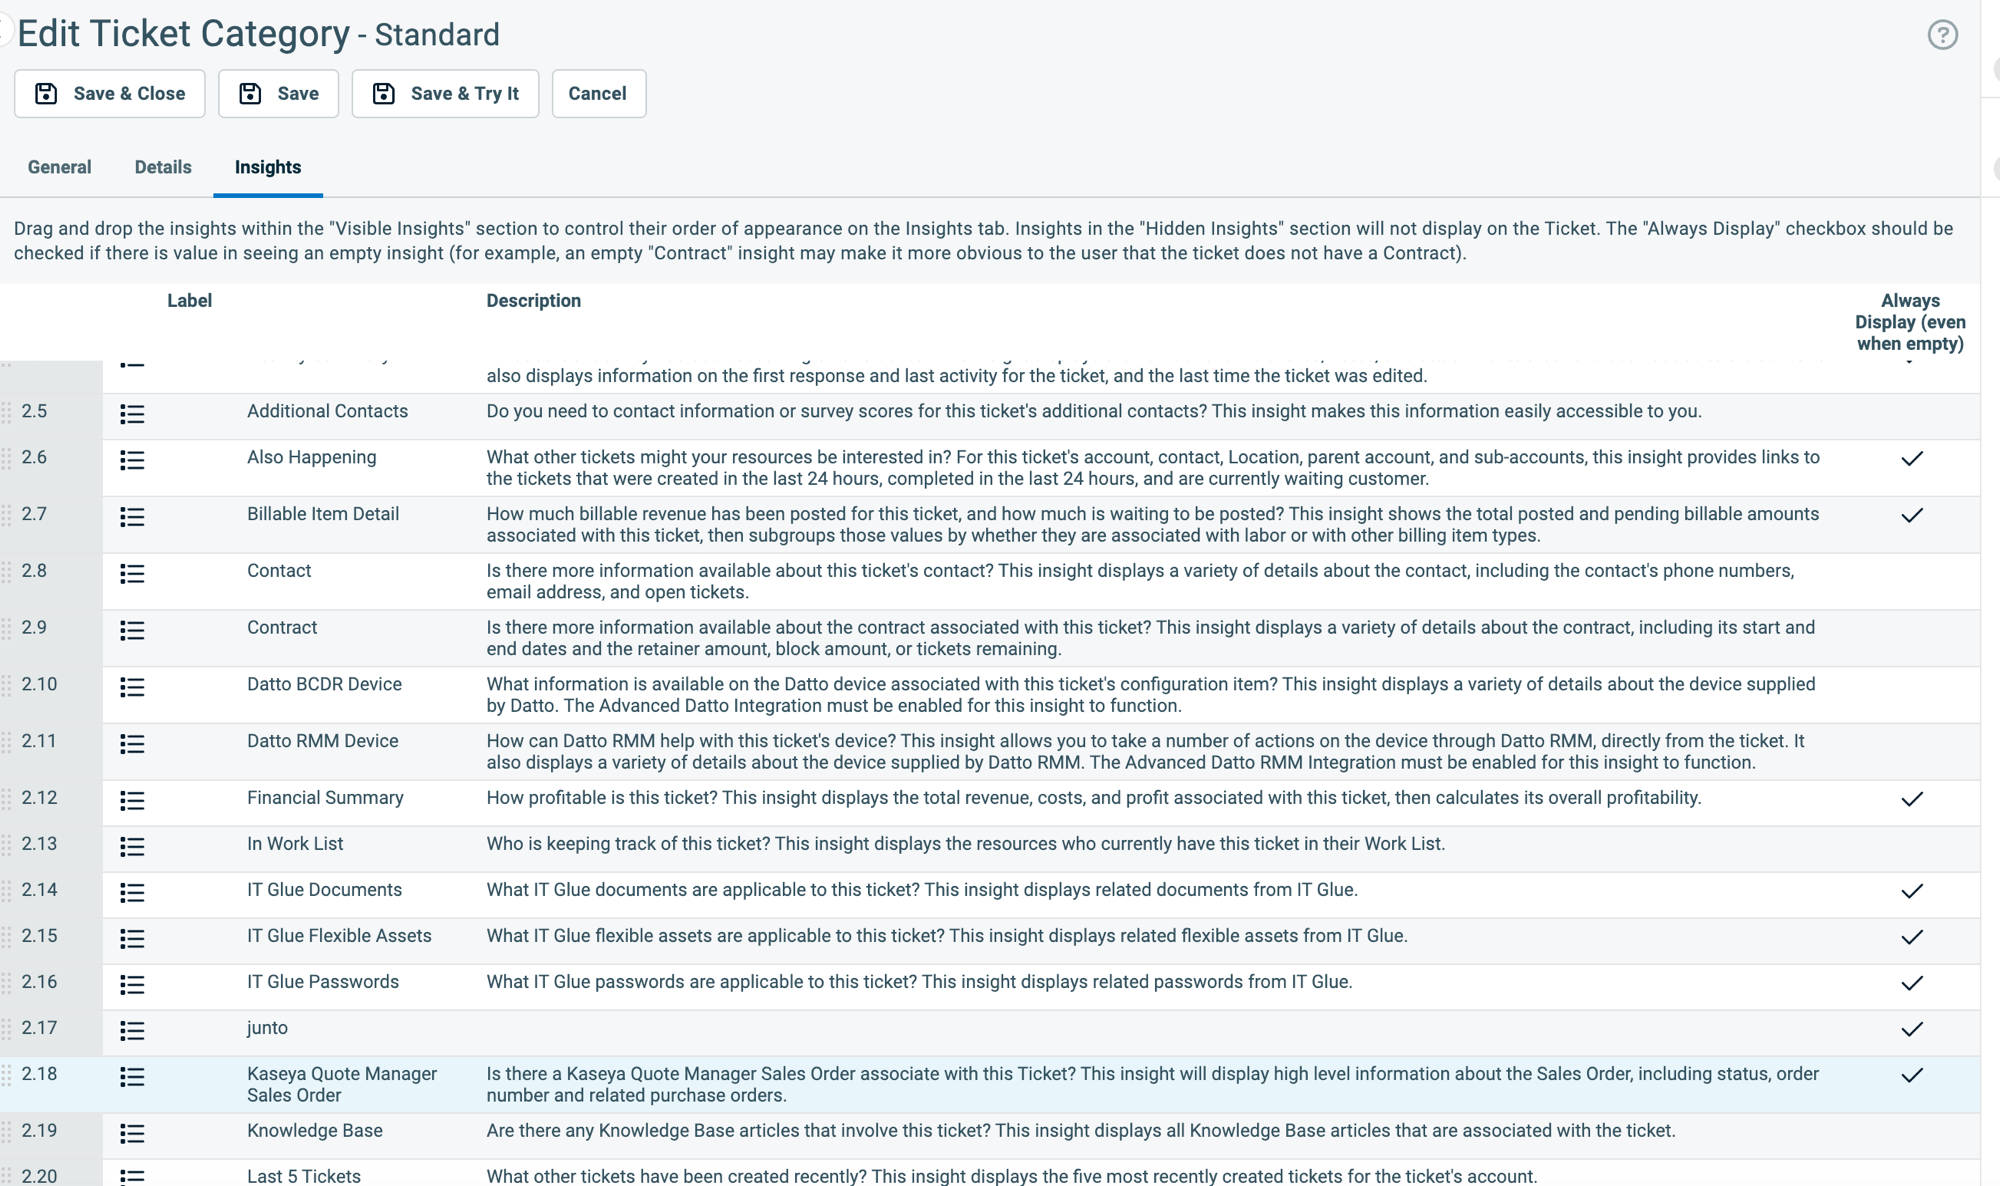
Drag the junto insight up into the Visible Insights section. Once it sits under Visible Insights (above the Hidden Insights group), click Save & Close to apply the change — the insight will then appear on tickets in this category.
Tip: If the panel doesn't appear, confirm the API user's API Tracking Identifier is set to the Junto Platforms integration vendor (not Custom). See Step 3.
Open any Autotask ticket in a category where the insight is visible — the Junto panel appears inline. Technicians sign in to Junto directly within the panel the first time they use it.
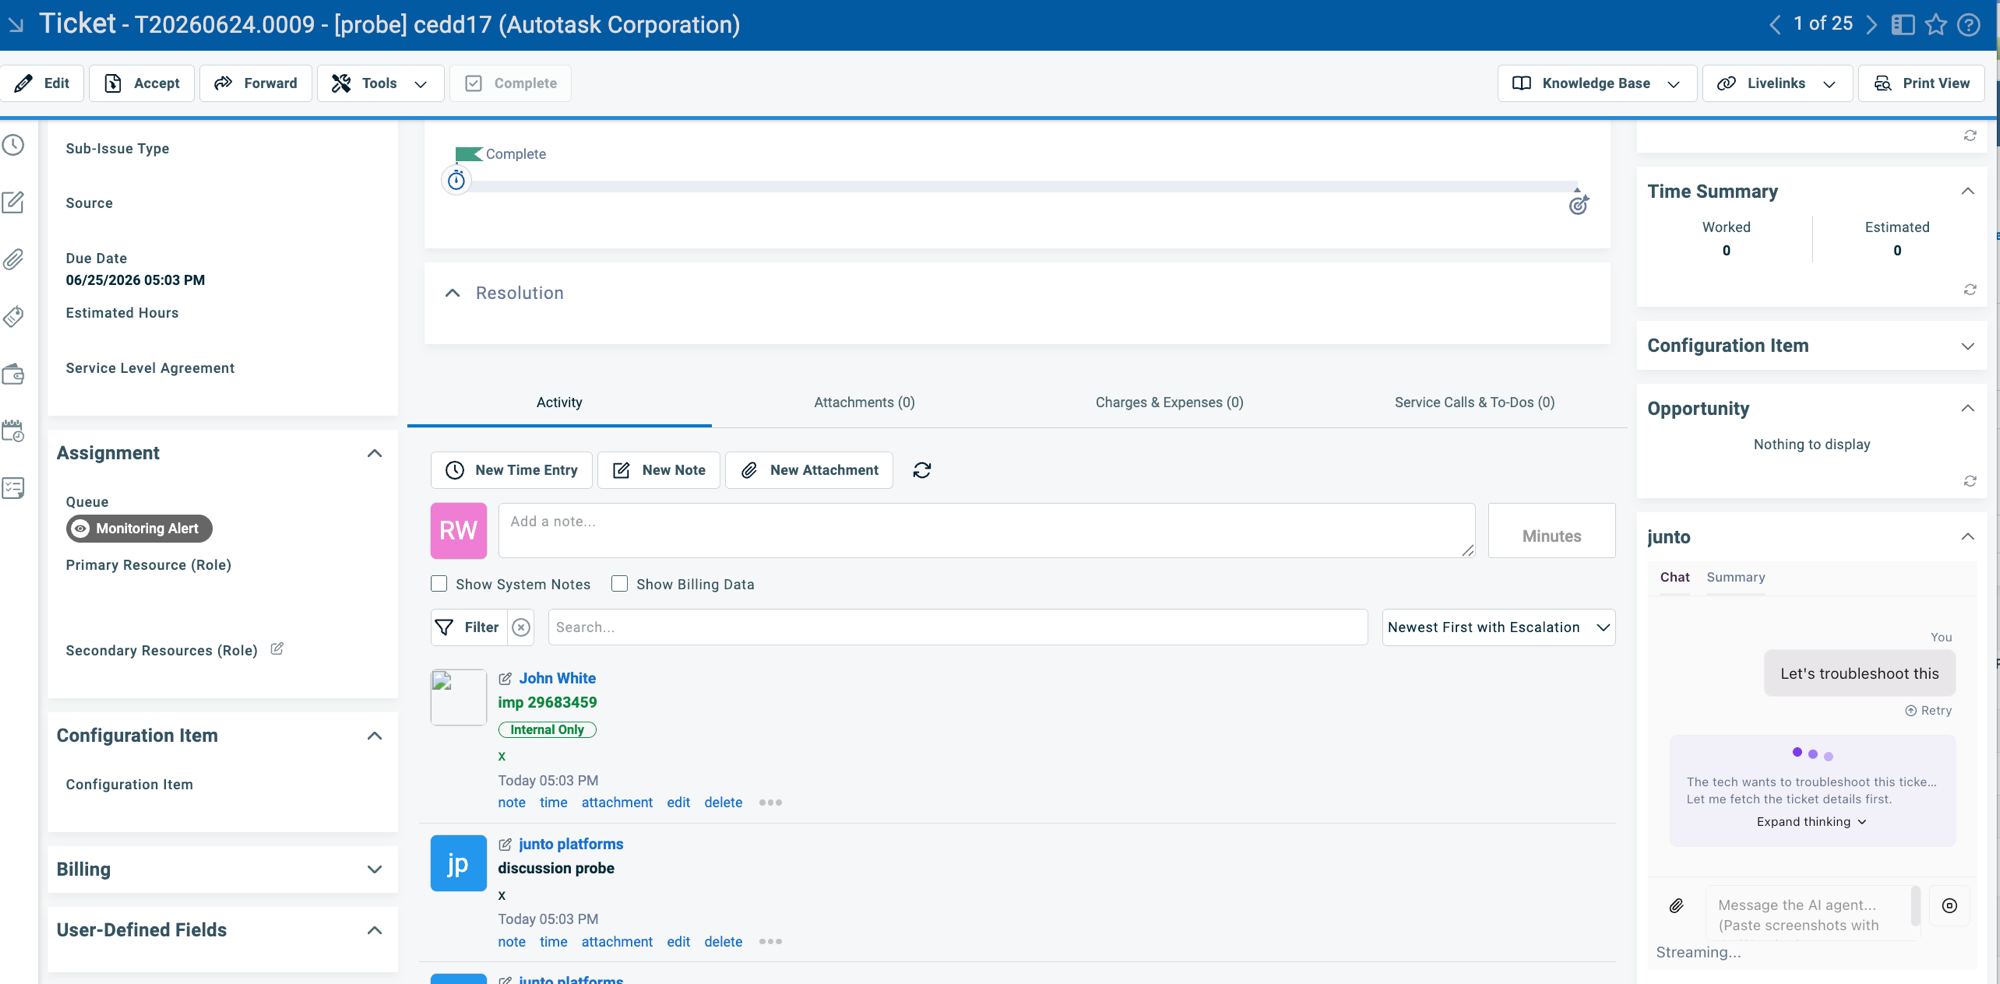
Once it's set up, the junto panel sits on the right side of the ticket with Chat and Summary tabs — technicians can ask the AI agent to troubleshoot, pull ticket details, draft notes, and more without leaving Autotask.
Additional actions on the card:
- Re-register in Autotask — Re-sync the embed if it was removed or needs updating in Autotask.
- Rotate secret — Roll the signing secret used to secure the embed.
- Deactivate — Remove the Junto Insight from your Autotask tickets.
Add a Junto Widget to the Autotask Homepage
You can pin Junto to your Autotask homepage as a widget so it's one click away from your dashboard.
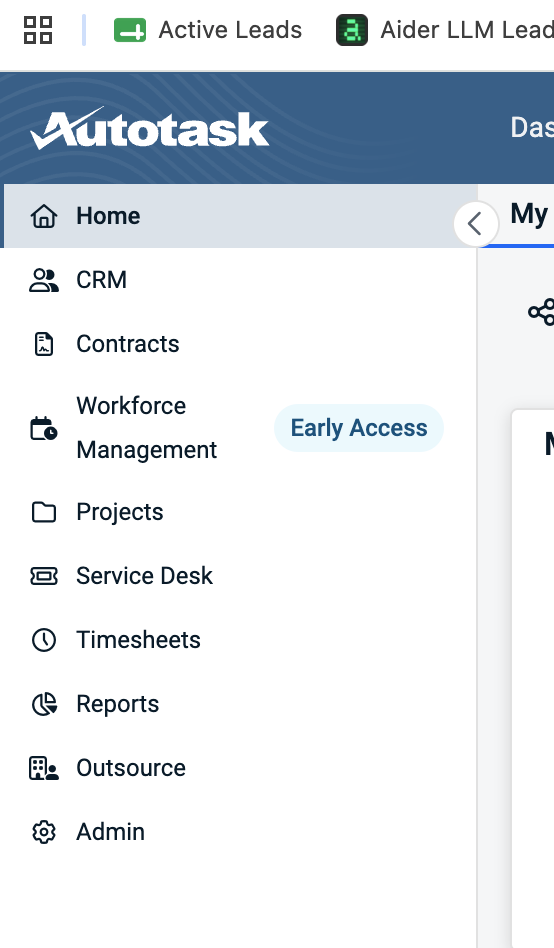
From the left navigation in Autotask, click Home.
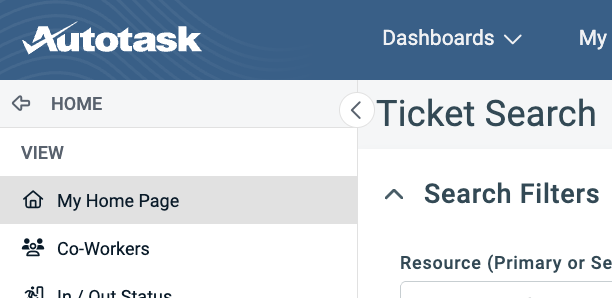
Under the VIEW section, click My Home Page.
In the tab bar across the top of your home page, click the + (Add Tab) button.

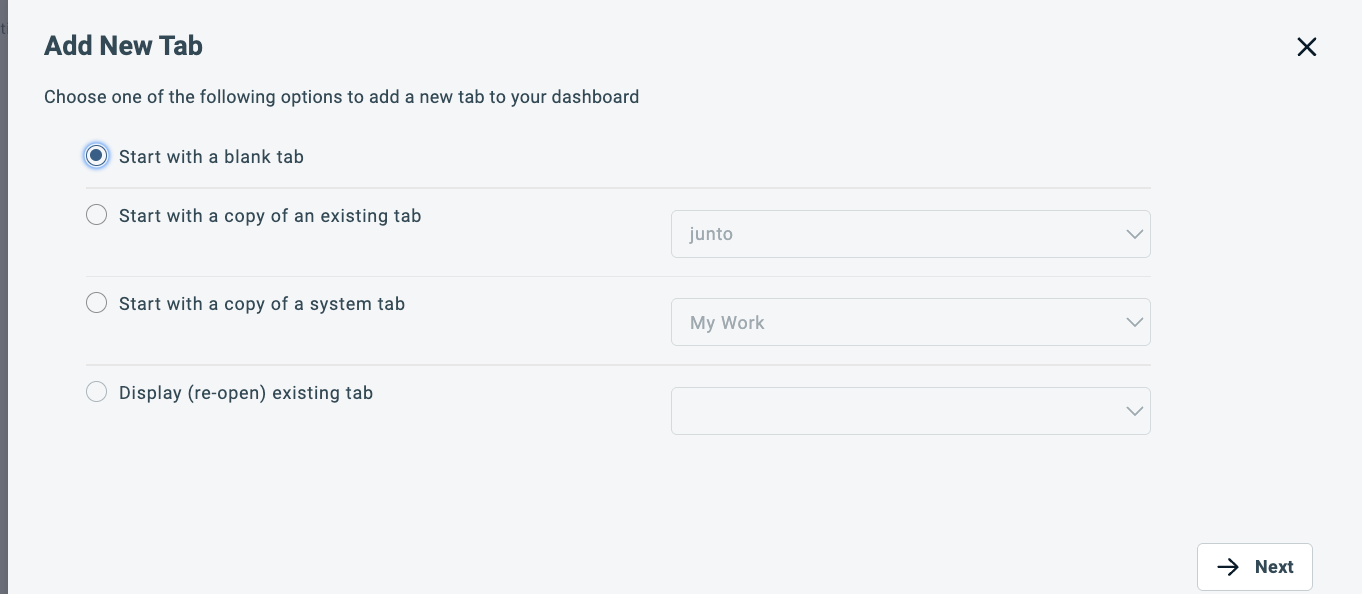
In the Add New Tab dialog, select Start with a blank tab, then click Next.
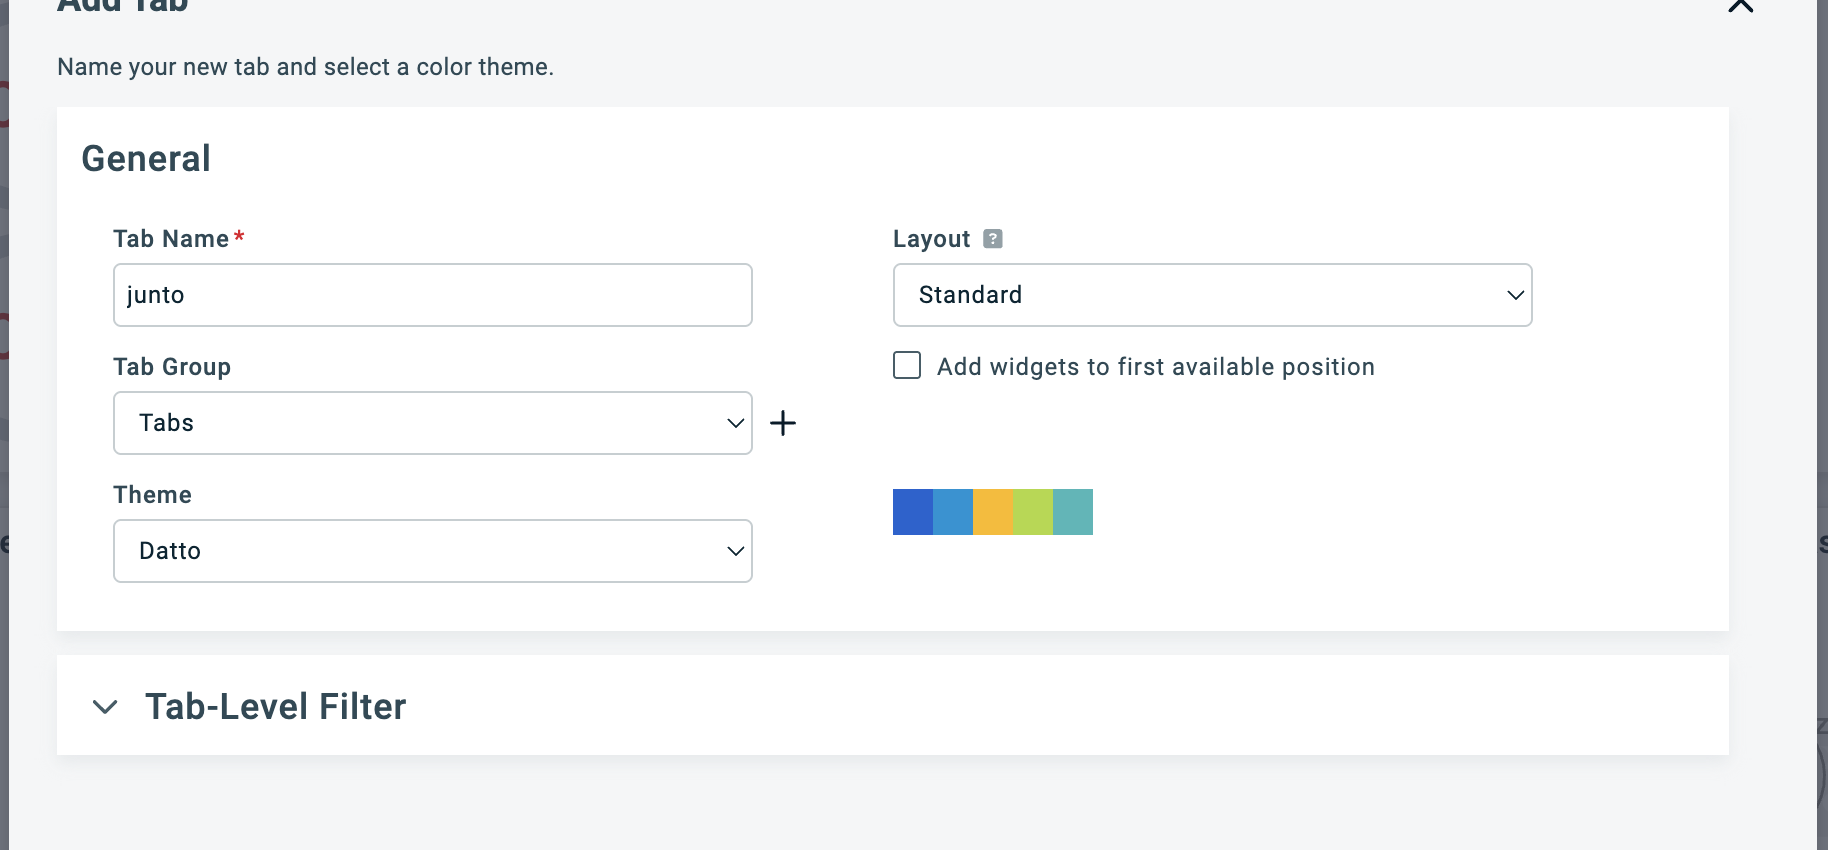
In the General section, enter Junto as the Tab Name. Leave Layout set to Standard (adjust the Tab Group and Theme if you like), then continue.
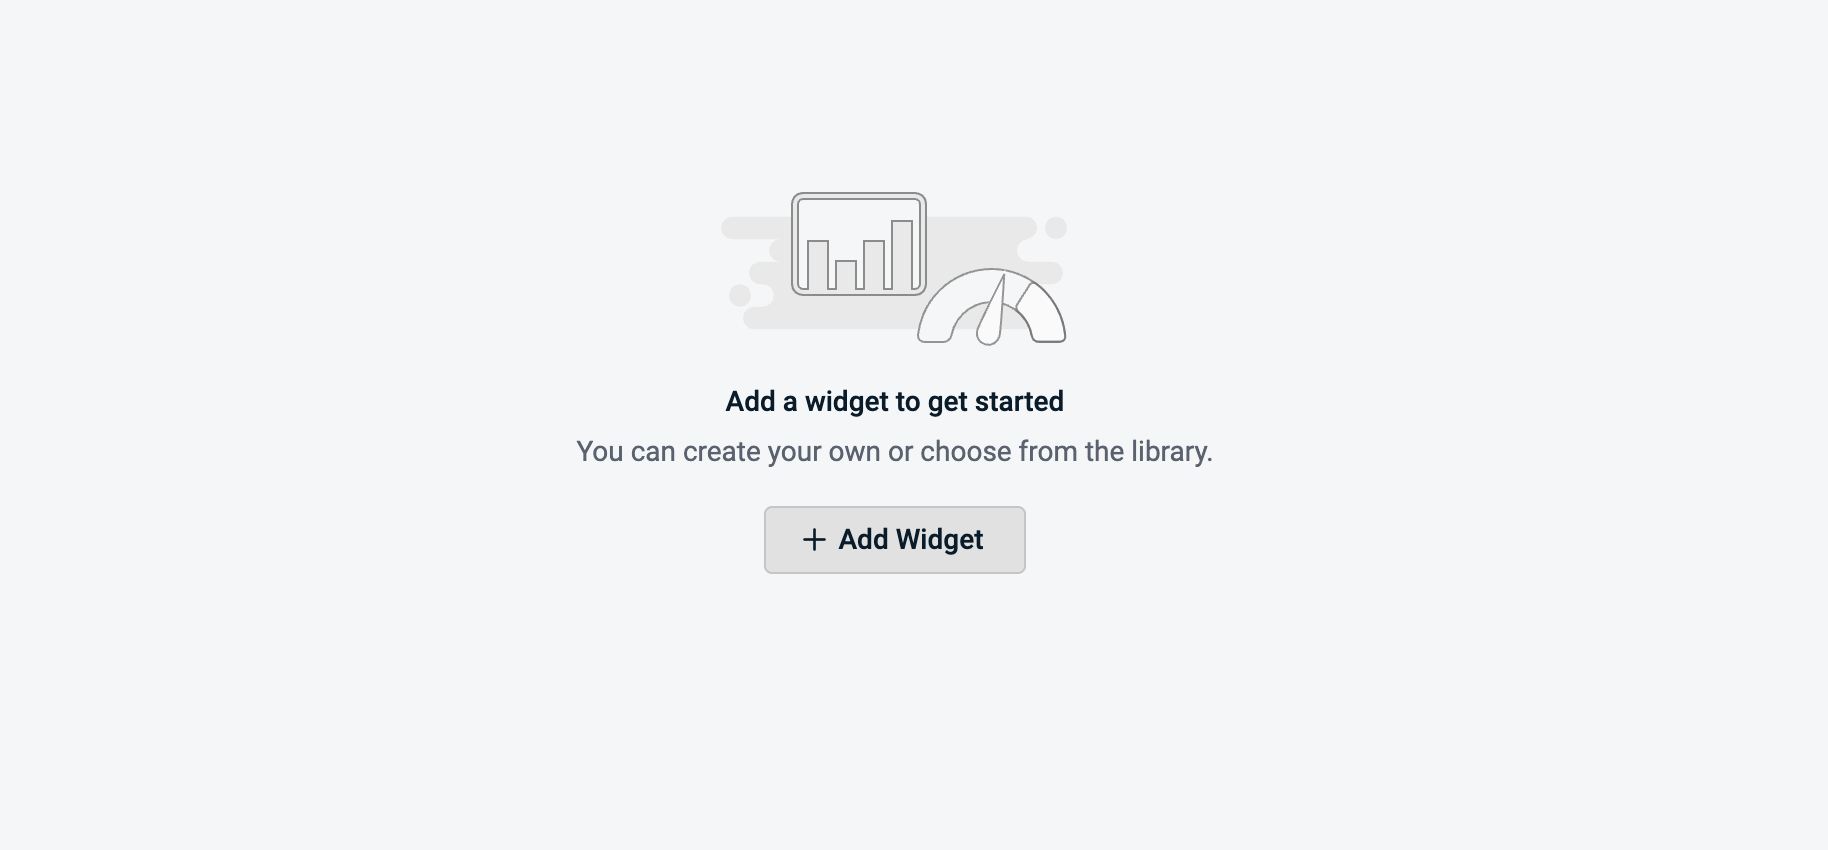
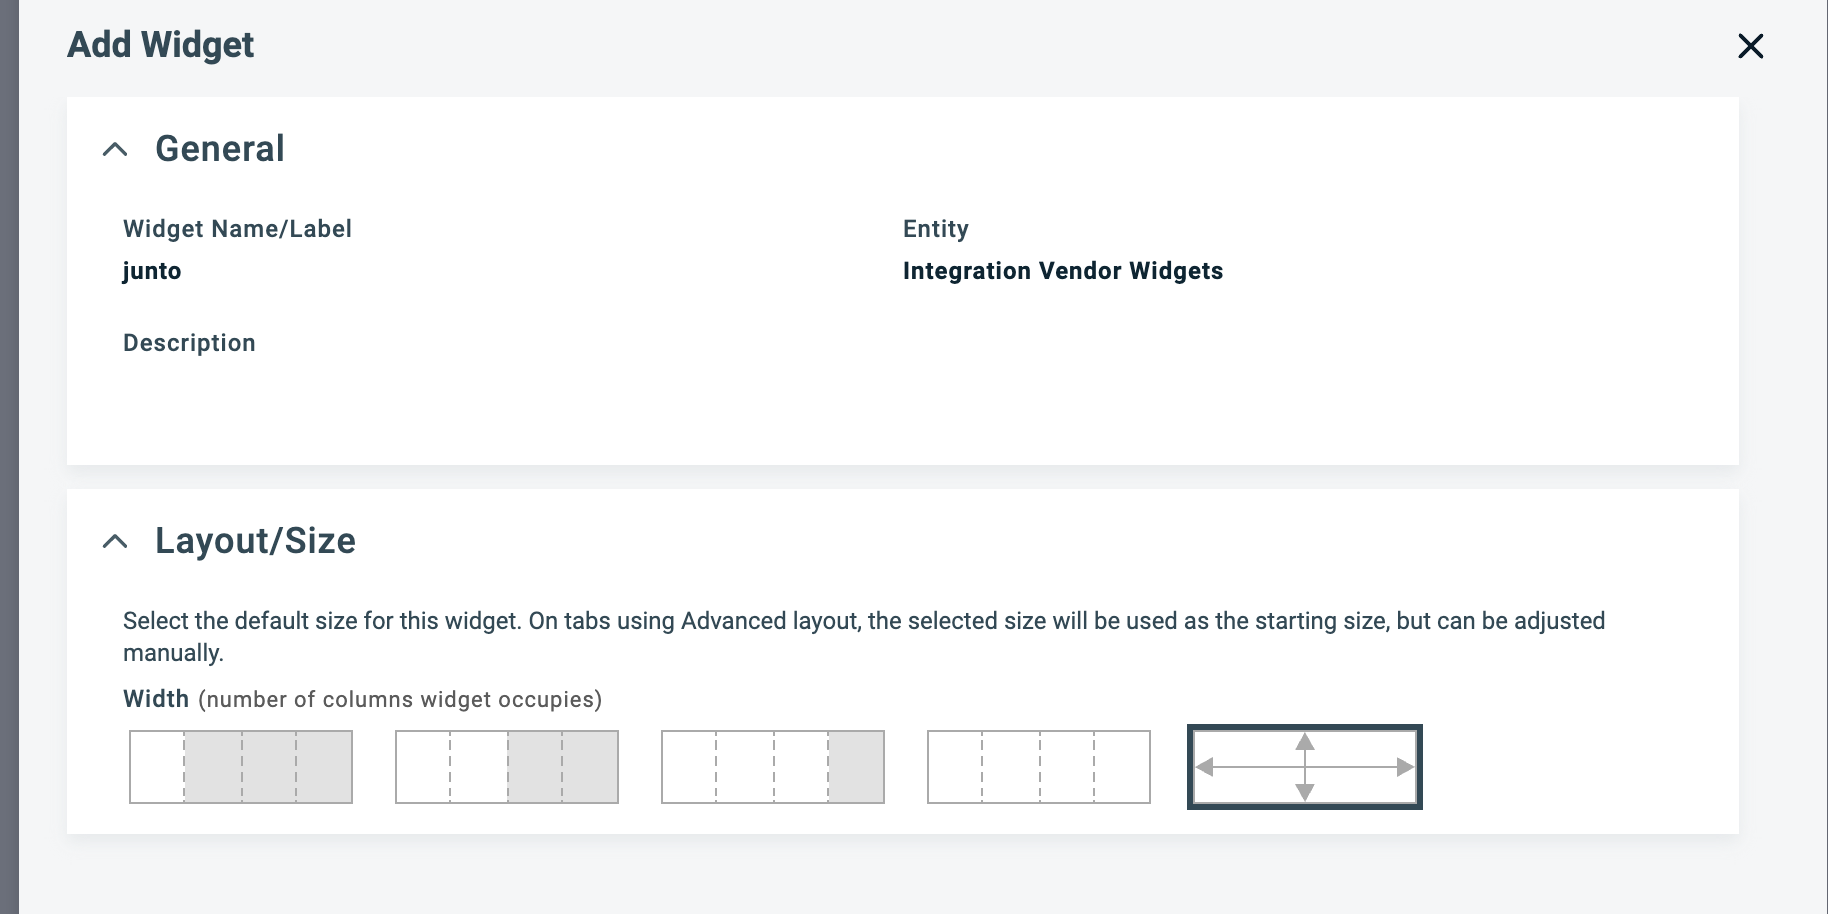
On the new, empty Junto tab, click + Add Widget.
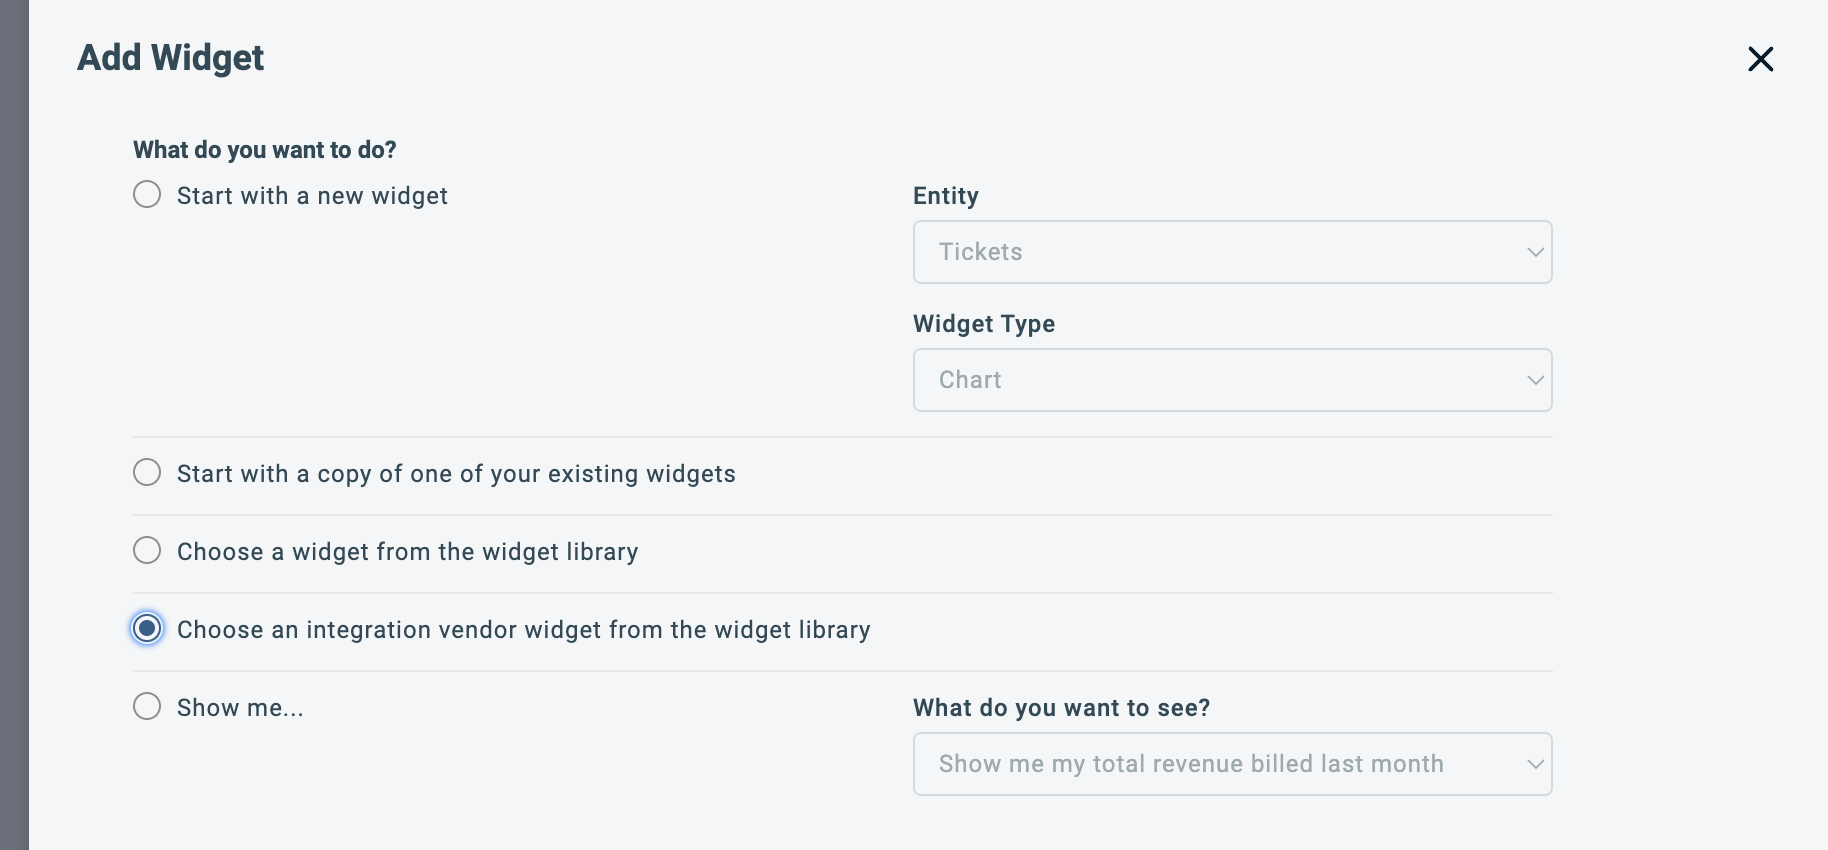
In the Add Widget dialog, under What do you want to do?, select Choose an integration vendor widget from the widget library, then continue.
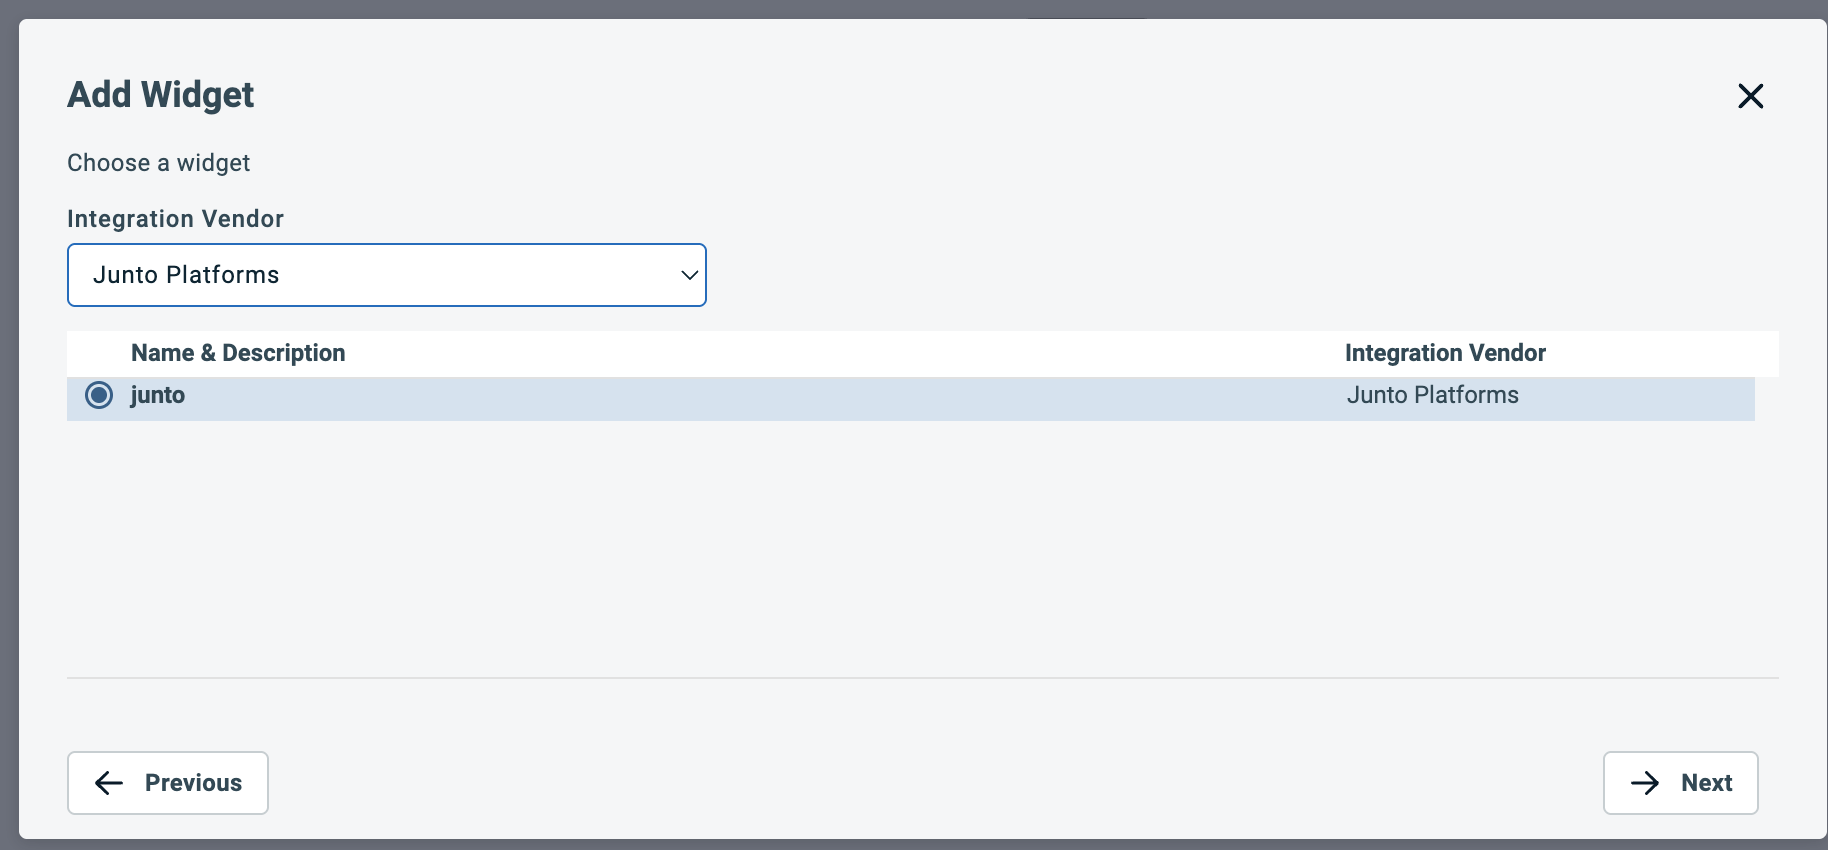
Set the Integration Vendor dropdown to Junto Platforms, select the junto widget from the list, then click Next.
Under Layout/Size, set the Width to the maximum (full-width) option — the far-right selection — so the Junto widget fills the tab.
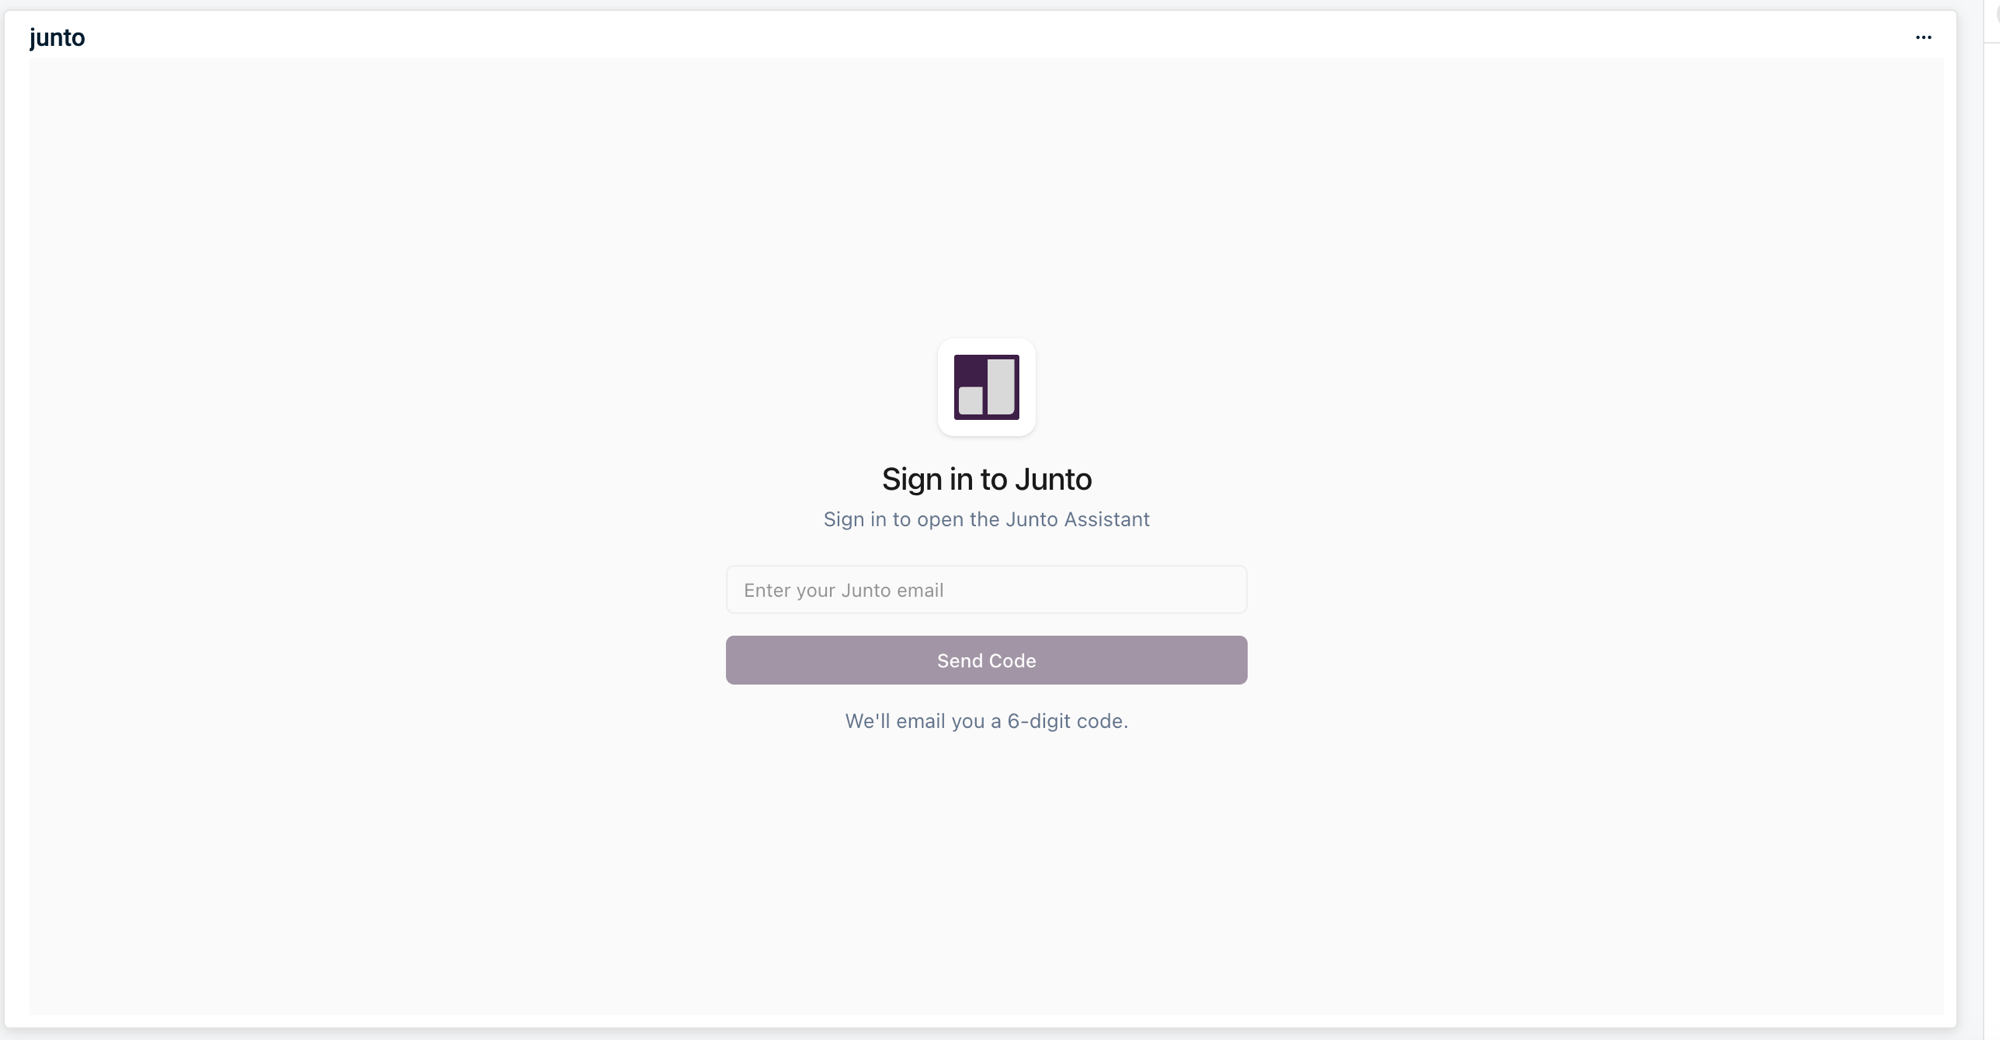
Save the widget. The Junto widget now appears on your home page tab. The first time you open it, sign in with your Junto email — Junto emails you a 6-digit code to confirm — and the Junto Assistant loads right inside your Autotask dashboard.
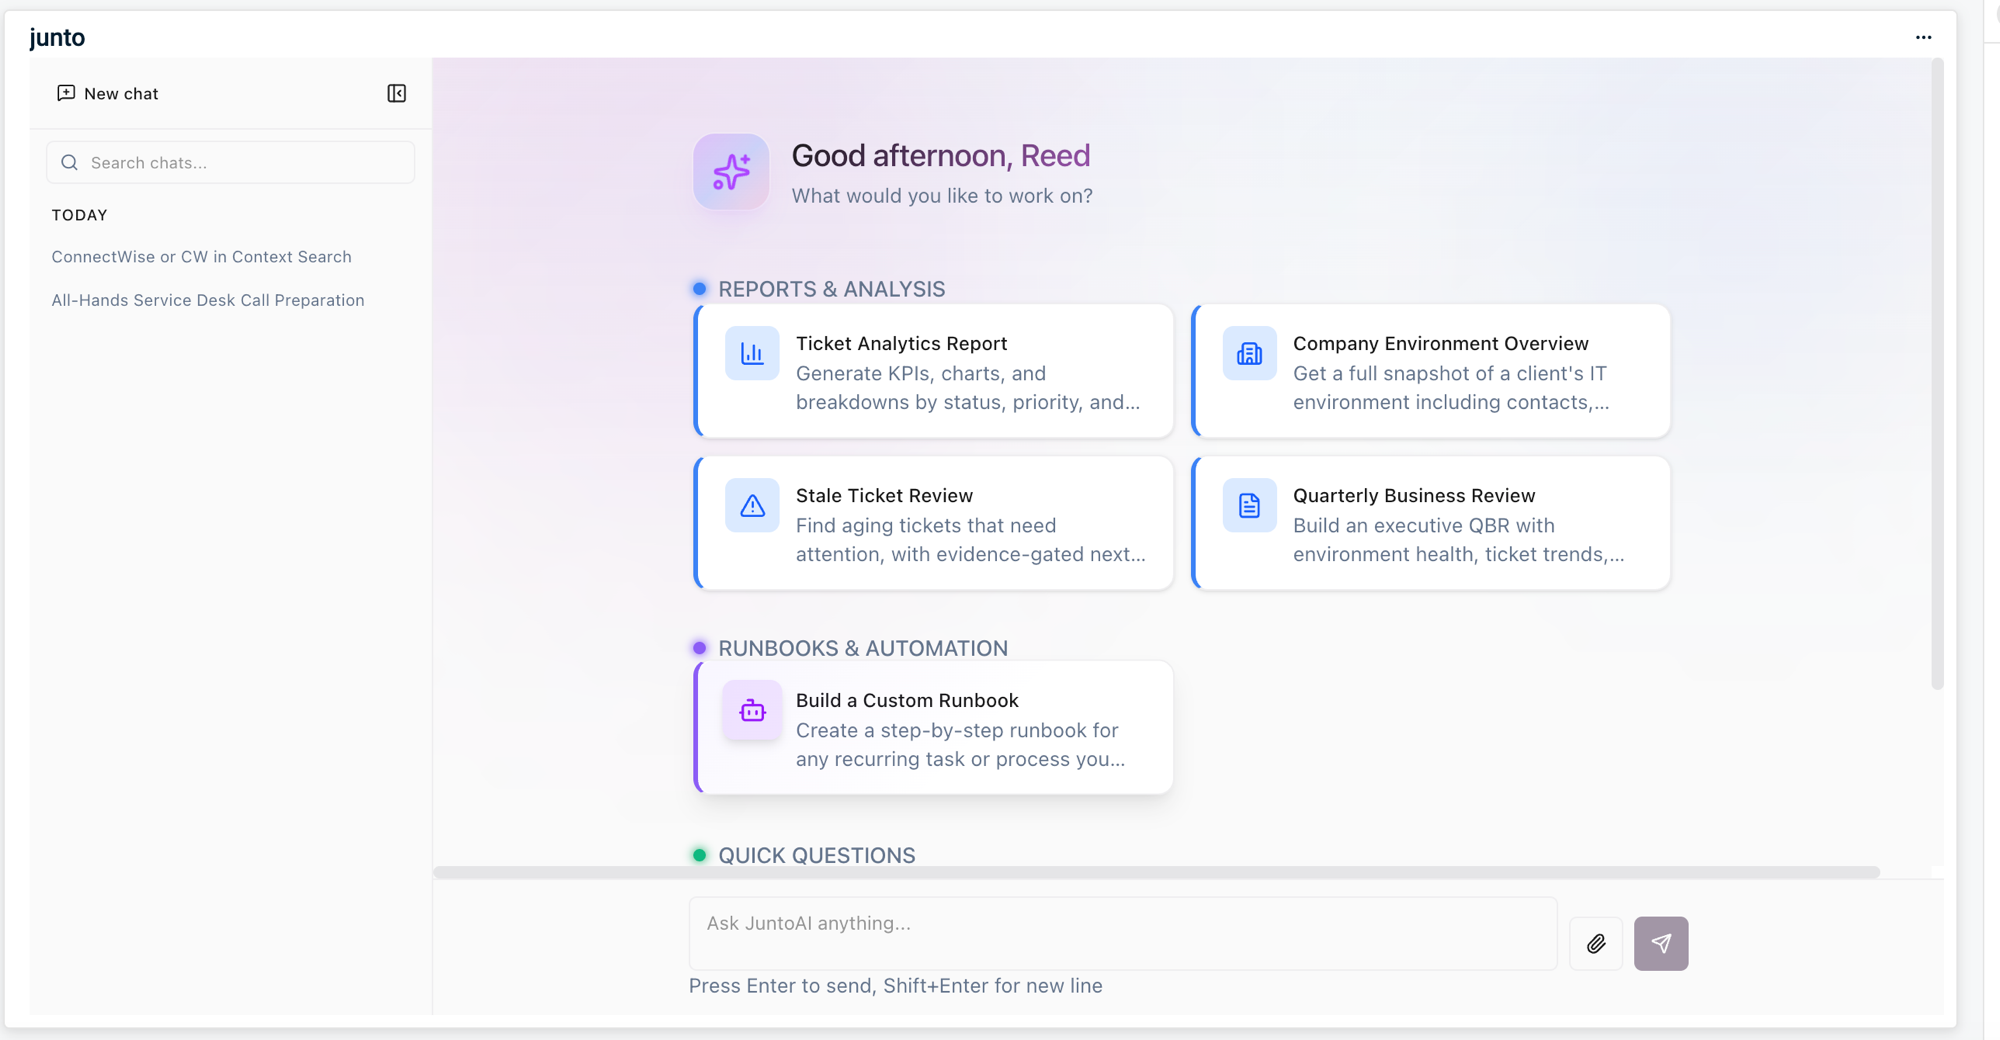
Once you're signed in, the full Junto Assistant runs right inside your Autotask dashboard — start a new chat, generate a Ticket Analytics Report, review stale tickets, pull a Company Environment Overview, build a Quarterly Business Review, create a custom runbook, or just ask Junto anything. The power of Junto, without leaving Autotask.
Share the Junto tab with your team
The tab you created only appears on your own home page. To make it available to other technicians, share it.
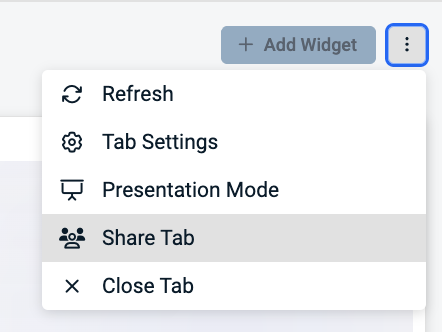
On the Junto tab, click the three-dots menu in the top-right corner and select Share Tab.
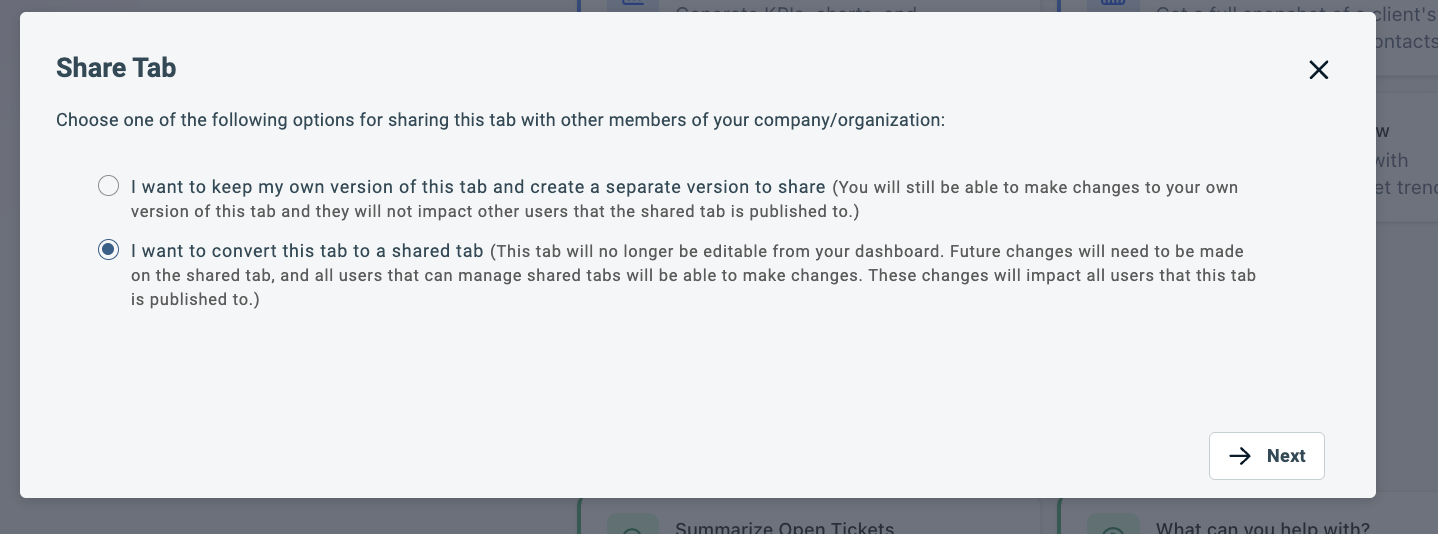
Choose how to share. To make this the single team-wide tab, select I want to convert this tab to a shared tab, then click Next. (The other option keeps your personal copy and publishes a separate shared version.)
Note: Converting means the tab is managed centrally — future changes are made on the shared tab by anyone who can manage shared tabs, and they apply to everyone it's published to.
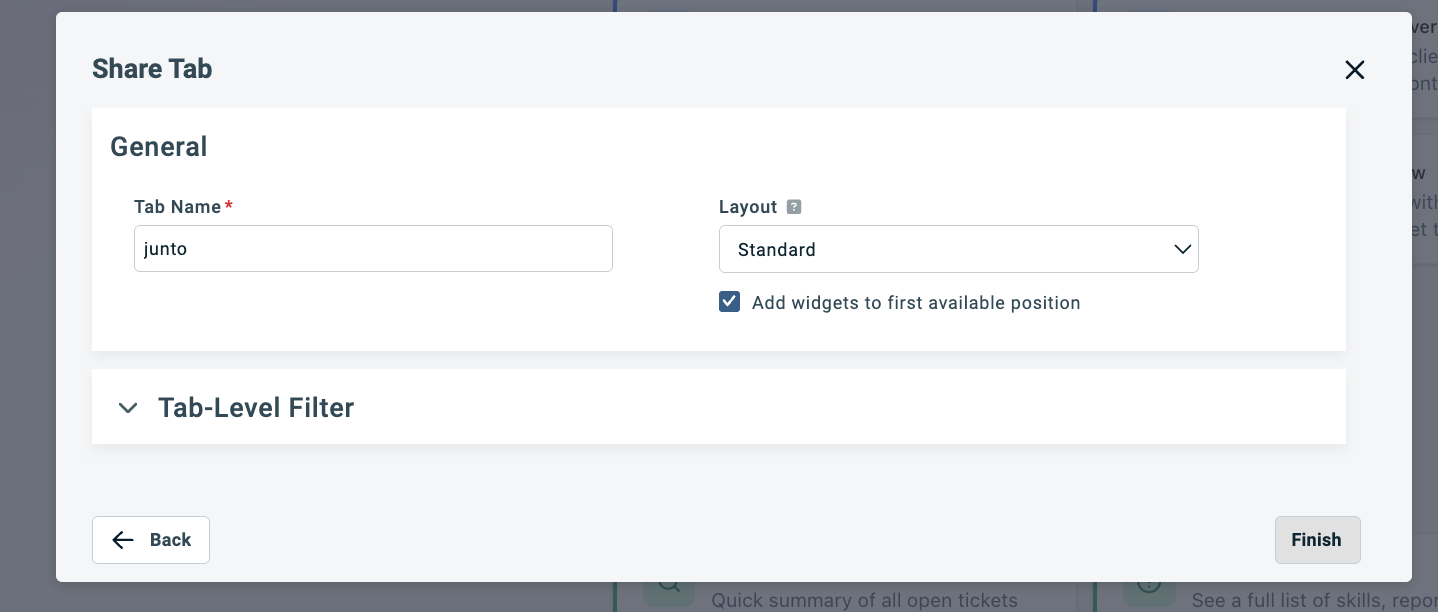
Confirm the General details — leave the Tab Name as junto and Layout as Standard — then click Finish.
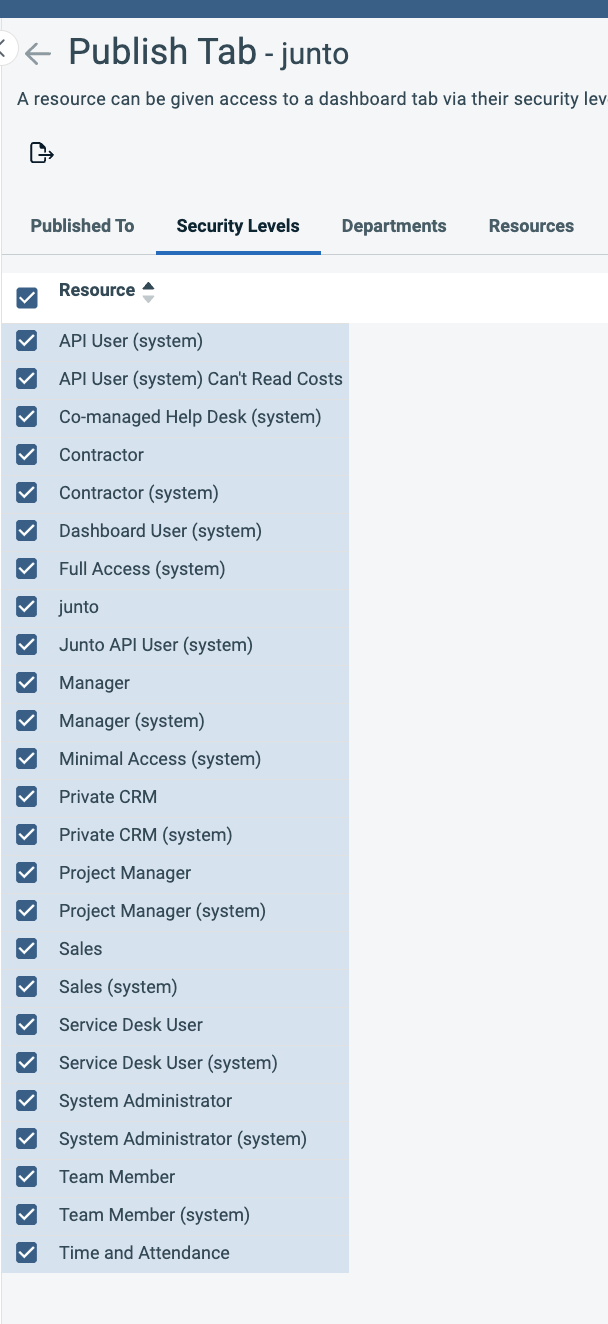
On the Publish Tab screen, choose who gets the tab. Use the Security Levels, Departments, or Resources tabs to target the right people — or check the box in the header row of the Security Levels list to select everyone at once. Selections apply as you check them; switch to the Published To tab to confirm who will receive it.
Everyone you publish to will now see the junto tab on their own Autotask home page. Shared tabs are read-only for recipients — they can move the tab or close it if they don't use it, but they can't edit or remove the Junto widget. To change the tab later, edit the shared tab itself (anyone who can manage shared tabs can do this) and the change applies to everyone.
More on Autotask shared tabs: Publishing a shared dashboard tab · Managing shared tabs · About dashboard tabs
Troubleshooting
- Connection fails — Verify the API User Email and Secret. Ensure the API-only user is active and its license type is API User (API-only).
- "Setup Required" badge — Read the error message on the configuration card. A credential error usually means the secret was rotated or the API user was disabled in Autotask. Re-enter the credentials and click Test Connection.
- Tickets not syncing — Confirm the correct queues are selected and that statuses have been seeded and mapped.
- Notes or time entries not attributed — Verify the member mapping. The Junto user who initiates the agent must be mapped to an Autotask resource. If notes post under the API account instead of the technician, confirm that technician's security level has Allow Impersonation enabled (see Step 2).
- Real-time sync not working — Confirm the API user's security level permits webhook creation. If changes in Autotask are not appearing promptly, contact Junto support.
- Insight panel not showing on tickets — Work through the checklist in order: (1) the Vendor Insights embed in Junto shows an Active badge (if not, click Register in Autotask); (2) in Autotask, the Junto Platforms vendor has Active and Enable Integration Vendor Ticket Insights checked in the Integration Center; (3) the Junto insight is in the Visible Insights list on the relevant Ticket Category; (4) the API user's API Tracking Identifier points to the Junto Platforms integration vendor. If technicians still can't load it, have them sign in to Junto within the panel.